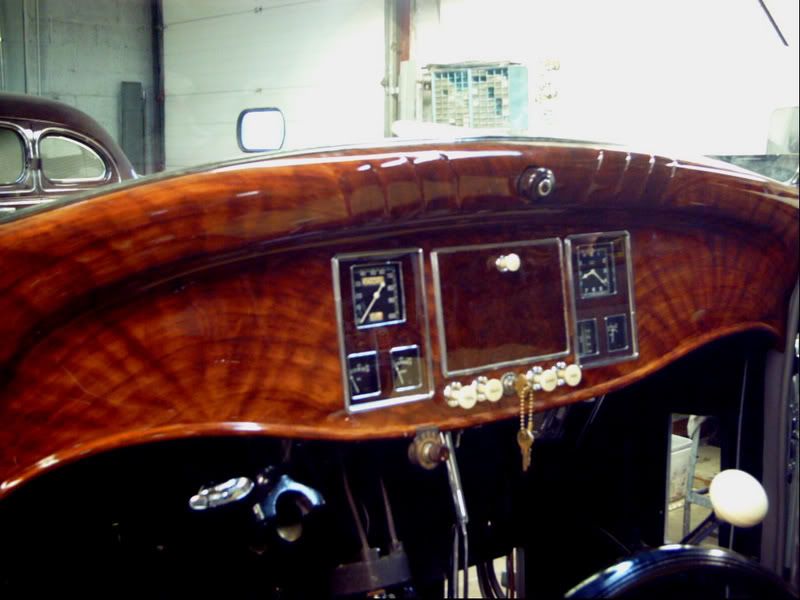
woodgrain redo

Sometimes I hate doing woodgrain, but I never give it up. Been at it since 1973 with 100% customer satisfaction. I have a very high level of respect for all woodgrainers and consider Jdee a colleague vs a competitor. There's several ways to get it done, and every OEM had at least 2-3 vendors to keep up with production. Continental, Pennisular Slate, and Modern Manufacturing are a few that come to mind. Some did celluloid transfers (a big water slide decal), some did rollers, some did a photgraphic transfer, and some even had artisans dragging combs and brushes. I've seen finger prints on the back of moldings, some were clearly a rubber glove, some didn't use em (!), and most were either metal stamped on the back or a rubber stamp with a copyright symbol. All of that aside, I prefer the "artistic" method. By that I mean with a brush and a medium that took years to work out for multi-layered compatibility. And regarding screw holes, yeah right. Having had to install many parts over the years that's something that's in my mind when I do it so I apply accordingly. Over the last couple years the hydro form deal has become popular. If you like the look of a late model Cadillac or Lincoln, maybe that's the ticket. To me, it looks like what it is, a big paper sticker with a photo of wood on it. Since the beginning, we always approached it with the idea that the interior is where you live in the car. It should be spectacular and make you feel good every time you see it. It should hold up for decades without fading and wearing off like the old hot varnish did. Having said all of that, here's a few examples of my love/hate relationship with woodgraining. These are a few Packards and Pierce Arrow:
IMG_0453.jpg


IMG_0119.jpg


IMG_0126.jpg


A burled walnut to match the real wood:
IMG_0100-123.jpg

IMG_0100-112.jpg


And yes, I do it with that little brush...
IMG_0100-12.jpg

Here's one from 1991 in a REO Royale. We left it alone during the re-restore in 08:
christmas_woodgrain013.jpg


It's a rewarding craft, but it can be very time consuming trying to get the right "vibe" to the work. Some of the Ford stuff appears almost crude compared to others, but even getting that earthy look can be a challenge. Hope ya like the pics...
 
Hi Allen,

There is a remarkable difference in one providing any type of new wood grain for the first time -- after a little practice, when well done, remarks will definitely vary from "not bad" to "wow".

But why first remove all existing paint, provide a new "not bad" wood grain, only to want to start over & remove all paint a second time, or repeating the same work several times.

Often recommended, but not always adhered to, in developing a new wood grain technique, rather than get frustrated or even giving up after wood grain is poorly provided on your metal parts, in order to get a "feel' & obtain far better final results, always try this:

1. Get some or several white poster boards with a slick surface, (like metal), rather than a grainy surface, usually sold in sizes of 24" x 36" & smaller.

2. Cut poster board into many pieces approximately 6" high x 12" long, & number each on the back side for future color & material identification starting witn (1).

3. On 8-1/2" x 11" paper, starting with (1), record colors of paint used, types of brushes or rollers, or other materials such as hair combs, etc., etc., corresponding to poster board numbers. (Get creative).

4. Remember each different wood grain one comes up with will look very different after the paint is dry -- an old addage with experienced artist & professional painters is, "if it looks bad wet, it will look good dry & vice versa."

5. If this is one's first time at wood graining, one will be totally surprised at how professional for example number (10) sample will look as compared to sample number (1).

6. If samples (1) through (5) look horrible, stop, relax, go get a coffee, & try again later, or the next day -- it is really like learning a new foreign language -- patience.

Have fun -- & sincerely hope this helps.
 
T-Bob,

I tried re- clear coating my original '34 Ford Deluxe Dash.
Though better, not great.
I'm going to sand blast and try to do it myself.
The original pattern appears to be Burl Mahogany or Walnut.
Do you have any tips on how to get a Burl effect?
What is the best tool/medium?

Cheers!!

SAVVY .........................
Here is an original 1934 Ford woodgrained ashtray in the walnut burl. It looks to me that the basecoat is about 50% covered with the black.
MIKE :)

CKICK ON PHOTO TO ENLARGE - Twice
 

Attachments

  • ashtray.jpg
    ashtray.jpg
    43.1 KB · Views: 37
I am having a terrible time trying to match the Mahoganey base coat from the Paint and Finish Guide. I have been to two different paint shops and neither could get close to the color. One is too brown one is to red. Any options?
 

Attachments

  • IMG00774-20120328-1319.jpg
    IMG00774-20120328-1319.jpg
    81 KB · Views: 22
  • IMG00773-20120328-1319.jpg
    IMG00773-20120328-1319.jpg
    79.8 KB · Views: 19
Last edited:
Highlander, you sure do nice work.

Woodgraining is what always attracted me to the MoPar's of the late 40's and early 50's.
 
We use Dupont Chromabase RS668 or the more red RS667
these are from the Spectramaster book.
These photos will look off probably, Computer monitors all show color differently.
But this is the Book we use.
The RS is for Red Solids... :)
Jdee
book.jpg

rs668.jpg
 
Last edited:
Back
Top