
You are using an out of date browser. It may not display this or other websites correctly.
You should upgrade or use an alternative browser.
You should upgrade or use an alternative browser.
Winter build project T body
- Thread starter 32 chevy vett
- Start date

32 chevy vett
Senior Member
I did not give the size of the wood fire wall. Check page1 photos#2. The fire wall should be 39 1/4" X27" X 3/4". The wood fire wall must be in place as it determines were the body mounts go. I used a pre 23 windshield.
The body sides are 2 pcs. 9"X 77 1/4" X 7/8". Seat (front) 9 1/2" X 42 1/2"X 7/8"(back)9"X 77 1/4" X 7/8".
For this I went to Home Depot. Got sheet of poplar PLWD 23/32" 4' X 8'.$39.28
I had them cut it 2 pcs. 9" for sides. 1 pc. 9 1/2" for seat. Cut the last pc.to size.Then strip 1/2" off 1pc.. They will do the cuts Free.
Now you should get a Qt.of oil paint start your painting.
Attachments


32 chevy vett
Senior Member
Add the trim 1 1/4"X 1/4". Where you see it in last photo.Before you add the front trim. You should make a piece of tin for the front corners.4" X 6" bent over and screwed to side of and front of seat. These are painted black. Thats up to you. Now that trim can go on over the tin.

redmodelt
Well-known member
I went with a quick build on mine. I have had it on the road for over 5 years. Ash framing, fir slats for top, ash plywood for sides. The side boxes are pine. I did drop the top down about 4 inches as it looked to tall and narrow along with the wind really blew over the top of the windshield. The next change would be to enclose the cowl area a little more.
MarkG
MarkG
Attachments


32 chevy vett
Senior Member
Hi redmodelt That's a neet little T. Those rear springs must help when the wind bad.
As you know a cross wind is bad on a model T.
As you know a cross wind is bad on a model T.
32 chevy vett
Senior Member
I tore mine apart to clear coat and paint before I got to far along. But you will need the tail gate size.8 1/2" X43 3/4" X 3/4". You will need 125 1/2" of 3/4"X 1/8" steel. To go around the tail gate.
Attachments


32 chevy vett
Senior Member
I will give it 3 coats of clear. Steel wool it between coats. Then tape it off and
paint it. And paint all the steel. Before I put the steel back on. I will take photos
and measurements. Then you can have fun making the steel parts.
paint it. And paint all the steel. Before I put the steel back on. I will take photos
and measurements. Then you can have fun making the steel parts.
32 chevy vett
Senior Member


32 chevy vett
Senior Member
6 pcs.15 1/4" X 1"X 3/16" Bend as in photo. 9"up make a 90* go 1" make a 38*.
Shape the bottom. Cut off a 3/8" bolt 2 1/4" long and weld it to the shaped end.
Lay flat so the bolt is offset then fill offset with weld. Then grind to shape.
Now drill for 1/4" carriage bolts. Up on the 38*1 1/2" drill first hole 3" more
drill second hole. Now you have to line the body with the tail gate in place.
You have to drill 3 3/8" holes.From the back of the rear bumper 10 1/4"- 32"-54" set the piece you made in place put a nut on it and tighten. Now drill the hole in the center of your trim.
Attachments


32 chevy vett
Senior Member


32 chevy vett
Senior Member
Thank you Matt. Welcome to the site. We will need 4 pcs.2 1/2" X 3/4" X 58 3/4". These will be the side rails.
Attachments



32 chevy vett
Senior Member
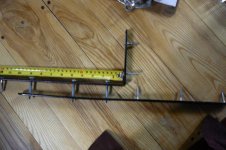
For the steel in photos. You need 2 pcs.1" X 3/16" 18 1/2" long.
2 pcs. 1" X 3/16" X 20' long.
Drill before you bend. Drill and countersink for the screws.
From bend on bottom 1"-4". Countersink for #12 X1 1/2" screws.
These hold the front post to the seat.
2 pcs. 1" X 3/16" X 20' long.
Drill before you bend. Drill and countersink for the screws.
From bend on bottom 1"-4". Countersink for #12 X1 1/2" screws.
These hold the front post to the seat.
32 chevy vett
Senior Member
I drilled all 1/4" holes out to 5/16" for carriage bolt heads. I painted all steel hardware. Next is the final fit and finish. Replace the philips screws with slotted.
Replace all hexagon nuts with square nuts. Put washers under all nuts. Save a small amount of mixed paint in a air tied bottle. To paint the nuts and screws.
Replace all hexagon nuts with square nuts. Put washers under all nuts. Save a small amount of mixed paint in a air tied bottle. To paint the nuts and screws.
Attachments

32 chevy vett
Senior Member


32 chevy vett
Senior Member
Top sides. 2 pcs. 4" X 3/4" X 9'. Rear 1 pc. 44 3/4" X 3/4" with 1/4"rise in center.
Clamp rear piece to two rear posts. Clamp the 9' side piece to rear post. Over lapping the rear piece.Now clamp to #2 post. At post #1 make a 6 3/4" circle
down 2" from top. Make a curved line. From top of circle to the bottom front end of of piece. Make a curved line from post #2 - 1 3/4" above the lower line.
I got the curve by clamping a 3/4" X 1/8"piece. To starting point and finish point. And adjust the curve. Then trace the curve I got. Do the same with all top pieces. After you get the first piece cut out. Trace on the second piece.
Attachments


Last edited:

Curt Campbell
Senior Member
Chevy Vette....I am so impressed with your work!!! Your EXCELLENT documentation is a blessing to us all.
THANK YOU FOR POSTING THIS....YOU ARE A MASTER!!!!!!!!
THANK YOU FOR POSTING THIS....YOU ARE A MASTER!!!!!!!!