
You are using an out of date browser. It may not display this or other websites correctly.
You should upgrade or use an alternative browser.
You should upgrade or use an alternative browser.
New member, first Ford project
- Thread starter m610
- Start date


m610
Member
Is that a Bamboo Bomber in the photo for your avatar?
There's no problem with this site's software. Are you sure that you didn't forget the very LAST step on the picture-posting process.... Clicking on the "SUBMIT REPLY" button at bottom?
Coop

m610
Member
Modest progress lately. We spent several days scraping the undercoating tar off the front suspension and steering linkage. In some places it was over a half inch thick. Underneath we found long lost grease nipples.
We have an original set of front shocks we plan to install.
Thanks for the tip on the color to paint the oil pan.
We de-greased the engine again and washed it with the Por-15 prep. This prep is supposed to be water soluble but after several rinses it still left a white residue. Is that how it is supposed to be?
We'll be back to work on the car on Monday and will probably work through the week on it. Most of the work will stop on Jan 3 when Richard leaves for extended travel. While he is gone we'll probably take the car to a body shop to have the rear fenders installed (we have like-new replacements) and other rust damage taken care of, especially around the running boards.
Merry Christmas, all!
Mike
We have an original set of front shocks we plan to install.
Thanks for the tip on the color to paint the oil pan.
We de-greased the engine again and washed it with the Por-15 prep. This prep is supposed to be water soluble but after several rinses it still left a white residue. Is that how it is supposed to be?
We'll be back to work on the car on Monday and will probably work through the week on it. Most of the work will stop on Jan 3 when Richard leaves for extended travel. While he is gone we'll probably take the car to a body shop to have the rear fenders installed (we have like-new replacements) and other rust damage taken care of, especially around the running boards.
Merry Christmas, all!
Mike

V8COOPMAN
Well-known member
Is that a Bamboo Bomber in the photo for your avatar?
Yup, a "Bamboo Bomber" it is. Technically, it's a Cessna T-50, although the Army Air Corp called them UC-78s, AT-8s & AT-17s, while the US Navy called them JRC-1s. Besides 'Bamboo Bomber', they have also been referred to by several endearing names, like 'Double-Breasted Cub', 'Bobcat', 'Useless-78' 'Wichita Wobbler' 'Crane' and 'Twin Cessna', among others.
Coop
https://www.fordbarn.com/attachments/506506/
Last edited:
m610
Member
Yup, a "Bamboo Bomber" it is. Technically, it's a Cessna T-50, although the Army Air Corp called them UC-78s, AT-8s & AT-17s, while the US Navy called them JRC-1s. Besides 'Bamboo Bomber', they have also been referred to by several endearing names, like 'Double-Breasted Cub', 'Bobcat', 'Useless-78' 'Wichita Wobbler' 'Crane' and 'Twin Cessna', among others.
Coop
I'm finishing up a book about a friend's dad who had some adventures in these flying between Texas and Nicaragua back in the mid 1950s.
Mike
V8COOPMAN
Well-known member
I'm finishing up a book about a friend's dad who had some adventures in these flying between Texas and Nicaragua back in the mid 1950s.
Mike
That interests me! What is the name of that book, and is it available? Thanks...
Coop
.
m610
Member
That interests me! What is the name of that book, and is it available? Thanks...
Coop
.
I recently got the manuscript back from my copy editor. I figure a month to finish it and get prints in my hands. We'll sell it through Blurb.com and Amazon.com.
Link on my web site: http://www.kstreetstudio.com/writing/bookBlueFiresAtDawn.html
Mike
V8COOPMAN
Well-known member
I recently got the manuscript back from my copy editor. I figure a month to finish it and get prints in my hands. We'll sell it through Blurb.com and Amazon.com.
Link on my web site: http://www.kstreetstudio.com/writing/bookBlueFiresAtDawn.html
Mike
Yo, Mike.... That link won't open here. Do you have a title that I can watch for?
Coop
.
m610
Member
It's an http site, not https. I guess I finally need to upgrade ($).
Try this one: https://www.kstreetstudio.com/writing/bookBlueFiresAtDawn.html
Title is "Blue Fires at Dawn".
Mike
Try this one: https://www.kstreetstudio.com/writing/bookBlueFiresAtDawn.html
Title is "Blue Fires at Dawn".
Mike
m610
Member
Not a whole lot of progress lately, but that's not for the lack of trying. I figure there are two phases to projects like this, the first being the breaking of rusty bolts phase, which is slow and lets blood now and then, and the second which is much more fun and involves putting parts back on the car. In VW circles there is a tradition of providing photo documentation of the first step in the second phase, and the part being installed is the ash tray.
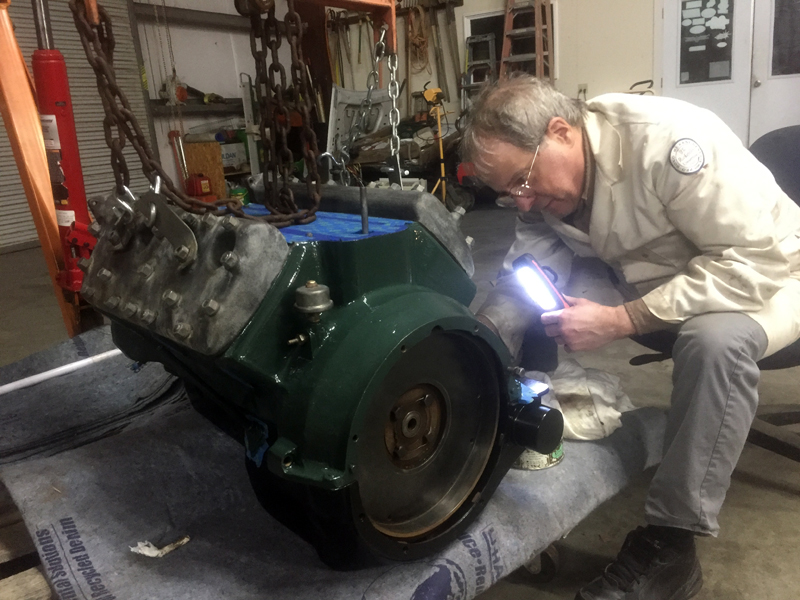
Anyway, we are finally painting the engine and Richard seems to really be enjoying that job. Meanwhile I am breaking bolts and torching stuck suspension links. My current challenge is removing the gas tank, and with two of three bolts out it looks like I may need a coal chisel to get the third one out. (The captured nut on the other side has broken loose.) Once it is out I sure am hoping the tank can be slid out without removing the body from the frame.
Also, the tank feels really heavy. Is it full of old gas/jelly?
(I hope the photo shows up this time.)
Mike
Anyway, we are finally painting the engine and Richard seems to really be enjoying that job. Meanwhile I am breaking bolts and torching stuck suspension links. My current challenge is removing the gas tank, and with two of three bolts out it looks like I may need a coal chisel to get the third one out. (The captured nut on the other side has broken loose.) Once it is out I sure am hoping the tank can be slid out without removing the body from the frame.
Also, the tank feels really heavy. Is it full of old gas/jelly?
(I hope the photo shows up this time.)
Mike

1942deluxe
Well-known member
My 42 coupe project has been marred by the frequent appearance of Vlad the Impaler. People think he died in the dark ages but he seems to be loose in Chris's (Sugarmaker) garage. Ripped about 3 layers of skin on my arm 3" by 3/4" awhile back. We wrapped it in a paper towel and secured it with painter's tape. I'm sure a couple of medical protocols were violated. Can't stop when you are working on an old Ford!
m610
Member
I'm clearly still in the breaking-rusty-bolts phase of the project, although today I broke only one and drilled and chiseled out another.
I wanted to remove the gas tank. I'm sure it needs to be boiled out. It's really heavy, as if when parked in 1955 it had a full tank of gas in it.
Three bolts hold it in and one bolt was stuck, so I drilled the head and chiseled off what remained. Then I took off the fender, which was a lot more work that it should have been, again, due to rust. One more bolt sacrificed.
Where the filler neck comes out of the car, in the fender.

The reason for taking the fender off was I hoped I could slide the gas tank to the driver's side and the passenger side would drop down. Once that end was lowered I could twist the tank around and get the filler neck to come through. It was not to be. I need another half inch or so to be able to get the tank past the frame. I'll try again tomorrow. Maybe I was missing something, or maybe I can unbolt the body in that area and find a little more room to work.
Anyway, skunky gas really stinks, and hours later the smell is still with me, and I hardly touched the stuff. Using a pair of vice grips I removed the drain plug and poked a punch up into the jelly and a dark red/brown liquid dribbled out. After several hours we had a quart of the stuff. Leaded, no doubt.

Richard finished painting the engine today. He really took his time, paying attention to the details. It looks great.

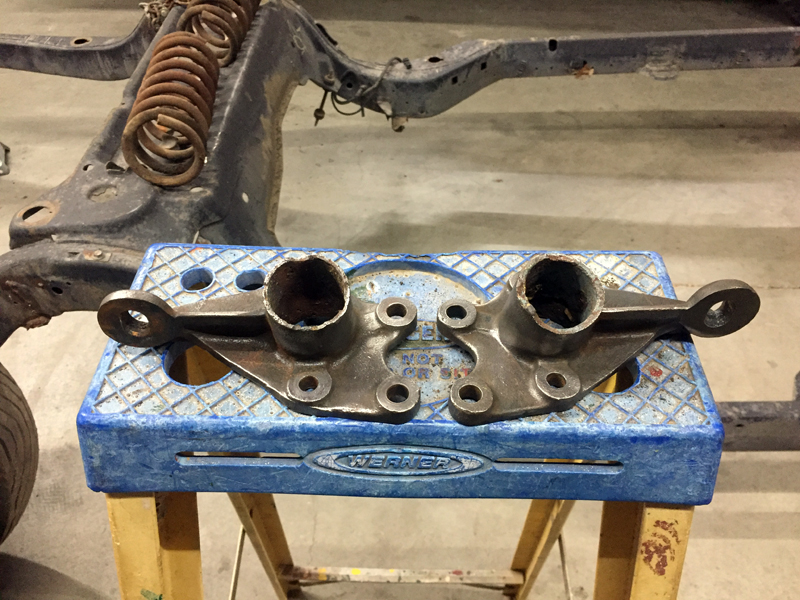
We'd like to be able to replace the motor mount arms, the one's that include the connection for the lower radiator hose. Does anyone know of a source for these?
Tomorrow a guy from a local body shop will come out to look at the car. He'll be making some basic sheet metal repairs, especially where the body under the rear fenders rusted and on the fenders where the running boards attach. We have a good set of spare running boards.
Mike
I wanted to remove the gas tank. I'm sure it needs to be boiled out. It's really heavy, as if when parked in 1955 it had a full tank of gas in it.
Three bolts hold it in and one bolt was stuck, so I drilled the head and chiseled off what remained. Then I took off the fender, which was a lot more work that it should have been, again, due to rust. One more bolt sacrificed.
Where the filler neck comes out of the car, in the fender.
The reason for taking the fender off was I hoped I could slide the gas tank to the driver's side and the passenger side would drop down. Once that end was lowered I could twist the tank around and get the filler neck to come through. It was not to be. I need another half inch or so to be able to get the tank past the frame. I'll try again tomorrow. Maybe I was missing something, or maybe I can unbolt the body in that area and find a little more room to work.
Anyway, skunky gas really stinks, and hours later the smell is still with me, and I hardly touched the stuff. Using a pair of vice grips I removed the drain plug and poked a punch up into the jelly and a dark red/brown liquid dribbled out. After several hours we had a quart of the stuff. Leaded, no doubt.
Richard finished painting the engine today. He really took his time, paying attention to the details. It looks great.
We'd like to be able to replace the motor mount arms, the one's that include the connection for the lower radiator hose. Does anyone know of a source for these?
Tomorrow a guy from a local body shop will come out to look at the car. He'll be making some basic sheet metal repairs, especially where the body under the rear fenders rusted and on the fenders where the running boards attach. We have a good set of spare running boards.
Mike
Not trying to be the wise guy here, but it sounds to me that you need a different approach to stubborn rusty bolts. Hence, some things I've learned from decades of rusty Minnesota bolts. 1, for a blind hole, if you can get at it with a hammer, like an exhaust manifold bolt, shock the head with a good blow on the head with a hammer before you even start, to remind it that you are the supreme human being and will not be out smarted by an inanimate object.
2, I like to use a breaker bar so I can "feel" if its turning or breaking. Often, I try to tighten it first, then loosen, to see if it moves. if it moves, start with your favorite juice and keep working it back and forth while gaining ground each time you go backwards and forwards.
3 before you break it, you take an acetylene torch heat one side of the hex nut dull red and get it to break loose, then I sometimes let it cool, oil it, and see if it moves again after its cold. If not, heat it again. Propane or Map gas does not work. The whole point is, you want the nut to expand faster than the bolt and then it breaks loose. If you spend all day heating with a wimpy torch you end up expanding the bolt as much as the nut so its still stuck, and while its all red hot it might move, but you have effectively welded them together and wrecked the threads. The key is...heat one side of the hex nut quickly and try it before the bolt expands too.
The cage nuts for the gas tank can be even more of a challenge. If you have any chance of pin holes in the tank, I would resort to some other kind of violence and leave the torch out of it. The cage nuts on fenders, I still like the torch. tricky to heat the nut without wrecking the cage, but again patience will prevail if you watch and pay attention to the color of the metal cage so as not to melt it and get the nut to a dull red. If you can get at it, I like to squish it hard with a vice grips while its hot, just before you try to move it, this will squeeze the cage on to the nut , which is good in the long run.
good luck, Happy new year !
2, I like to use a breaker bar so I can "feel" if its turning or breaking. Often, I try to tighten it first, then loosen, to see if it moves. if it moves, start with your favorite juice and keep working it back and forth while gaining ground each time you go backwards and forwards.
3 before you break it, you take an acetylene torch heat one side of the hex nut dull red and get it to break loose, then I sometimes let it cool, oil it, and see if it moves again after its cold. If not, heat it again. Propane or Map gas does not work. The whole point is, you want the nut to expand faster than the bolt and then it breaks loose. If you spend all day heating with a wimpy torch you end up expanding the bolt as much as the nut so its still stuck, and while its all red hot it might move, but you have effectively welded them together and wrecked the threads. The key is...heat one side of the hex nut quickly and try it before the bolt expands too.
The cage nuts for the gas tank can be even more of a challenge. If you have any chance of pin holes in the tank, I would resort to some other kind of violence and leave the torch out of it. The cage nuts on fenders, I still like the torch. tricky to heat the nut without wrecking the cage, but again patience will prevail if you watch and pay attention to the color of the metal cage so as not to melt it and get the nut to a dull red. If you can get at it, I like to squish it hard with a vice grips while its hot, just before you try to move it, this will squeeze the cage on to the nut , which is good in the long run.
good luck, Happy new year !
m610
Member
Thanks for the tips. I do some of this. I usually soak with PB Blaster or something similar, whack it with a hammer, then come back later and wet it again then I use a breaker bar. It's much easier to control the force applied when using a breaker bar. If the bolt gets harder to turn after a few turns it's probably rust on the end of the bolt being dragged into the nut, so I tighten, then loosen again, and repeat until the bolt comes out.
I used propane on the dog bone suspension links and that worked okay, doing much what you said, trying to keep the heat on the collar rather than the stud/shaft/pin, whatever it is called.
But, I'm only dealing with 50 years of Ohio rust, so probably not as bad as what you get.
Mike
I used propane on the dog bone suspension links and that worked okay, doing much what you said, trying to keep the heat on the collar rather than the stud/shaft/pin, whatever it is called.
But, I'm only dealing with 50 years of Ohio rust, so probably not as bad as what you get.
Mike
V8COOPMAN
Well-known member
Earnest question, is it possible to get the gas tank out without removing the body?
Yup, on a '36.... it comes out the bottom after sliding the tank to one side. Lower OTHER side. On SOME cars, you MAY have to coax it by slightly forcing (twisting) the bottom of the two frame rails apart. Use a piece of 2 X 4 against the bottom lip of the opposite side frame rail. Coax (spread) the two bottom frame flanges apart with a pry bar.
Coop
.
m610
Member
Much thanks. That's what I figured but I was probably being a little shy with the coaxing.
And now that I think about it and see your advice about spreading the frame rails, this car once got hit in the right rear hard enough to destroy the fender, so the frame might have been pushed in a bit. As it sits now I need about another half inch to clear the frame.
Mike
And now that I think about it and see your advice about spreading the frame rails, this car once got hit in the right rear hard enough to destroy the fender, so the frame might have been pushed in a bit. As it sits now I need about another half inch to clear the frame.
Mike
