
You are using an out of date browser. It may not display this or other websites correctly.
You should upgrade or use an alternative browser.
You should upgrade or use an alternative browser.
Temperature Gauge Installation
- Thread starter Conaway2
- Start date

nkaminar
Well-known member
See https://www.snydersantiqueauto.com/product.htm?pid=979205&cat=41737
You can run it through the instrument panel and tie wrap it to the wire leading to the generator/alternator. Or along one of the radiator braces. A link to instructions at site above.
You can run it through the instrument panel and tie wrap it to the wire leading to the generator/alternator. Or along one of the radiator braces. A link to instructions at site above.
Last edited:

rich40701
Senior Member
Mine runs through the terminal box, no drilling required. My gauge is currently a vintage generic brand that looks like a Steward Warner but I have a Boyce Moto Meter from the 30's I believe that works but is off by about 20 degrees so hopefully it can be calibrated or if nothing else the needle can be moved.

Tom Endy
Well-known member
Here is how I did mine years ago. I ran the cable down along the steering column.
http://www.santaanitaas.org/wp-content/uploads/2014/08/Temp-Gauge.pdf
Tom Endy
http://www.santaanitaas.org/wp-content/uploads/2014/08/Temp-Gauge.pdf
Tom Endy


1955cj5
Well-known member
I installed a temp gauge using the modified water outlet that allows the temp probe to be installed from the side. Routing is as already mentioned, follow the generator wire and through the terminal box. My repro gauge is mounted under the speedometer using one of the mounts available from the vendors.
One very annoying issue is that I cannot torque the head nut that is just below the temp probe, without draining the cooling system and removing the probe. Did I mention that this is very annoying??.
There isn't enough vertical clearance to use the thin walled craftsman socket with the probe installed and the special Snap-On S-8663-A tool won't fit between the nut and the side wall of the outlet. If I ever remove the outlet I will open that up a bit but until then...
Now not all modified outlets may have this problem, and I don't really remember where I got it as it was several years ago. But it might be worth checking out before installing a modified outlet.
See pictures.
One very annoying issue is that I cannot torque the head nut that is just below the temp probe, without draining the cooling system and removing the probe. Did I mention that this is very annoying??.
There isn't enough vertical clearance to use the thin walled craftsman socket with the probe installed and the special Snap-On S-8663-A tool won't fit between the nut and the side wall of the outlet. If I ever remove the outlet I will open that up a bit but until then...
Now not all modified outlets may have this problem, and I don't really remember where I got it as it was several years ago. But it might be worth checking out before installing a modified outlet.
See pictures.
Attachments


Last edited:

ModelA29
Well-known member
Mine has a vintage looking Stewart Warner gauge with the wings. Single gauge mount under the inst panel is from Berts. The water outlet is the type that uses a thermostat. The gauge line runs along the generator wire into the terminal box.
Attachments


If you haven't already purchased the modified upper gooseneck, you might want to consider the Vintage Precision thermostat housing with temp probe port as an alternative (see ModelA29's picture for this). That way you get a thermostat in addition to the temperature probe. I also ran my temp probe cable through the wiring box on the firewall.
JayJay
JayJay
Last edited:

Conaway2
Well-known member
Wow ! Thanks for all the responses so quickly ! This is all very useful information - es[ecially about routing the electrical or capillary tubing from the engine compartment into the car.
Tom Endy - your article is great, and gives me an idea how to mount a gauge in my car.
1955cj5 - thanks for the wrench clearance note - I would not have thought of that, so thanks for the heads-up !
Jim
Tom Endy - your article is great, and gives me an idea how to mount a gauge in my car.
1955cj5 - thanks for the wrench clearance note - I would not have thought of that, so thanks for the heads-up !
Jim

Y-Blockhead
Well-known member
1955cj5 - thanks for the wrench clearance note - I would not have thought of that, so thanks for the heads-up !
Jim
You shouldn't have the clearance issue if your car is a '30-31. I use a ⅝" socket.
I have a 270° sweep Stewart Warner gauge. I prefer the 270° sweep gauges as the numbers are farther apart and easier (for me) to read.
I routed it with the other wires and up the steering column. I wrapped it is ClassicBraid so it resembled the other wire loom.
Last edited:
nkaminar
Well-known member
This is a very handy inexpensive wrench for torquing those hard to reach nuts.
https://www.snydersantiqueauto.com/product.htm?pid=978661&cat=41753
https://www.snydersantiqueauto.com/product.htm?pid=978661&cat=41753
Y-Blockhead
Well-known member
This is a very handy inexpensive wrench for torquing those hard to reach nuts.
https://www.snydersantiqueauto.com/product.htm?pid=978661&cat=41753
If the Snap-On wrench or a socket won't fit on CJ5's car those gyp (Henry's word, not mine) ones surely won't fit as they are about twice as thick where it fits the nut. See post #5
Last edited:


Taking a different approach, I bought an all-metal gauge cup from Amazon that was a perfect fit for the gauge and installed it on top of the steering column with a black hose clamp and then ran the capillary tube down the steering column. Nice, clean installation and I like the gauge up high making it easy to do a quick temperature check.
Attachments


Synchro909
Well-known member
I installed a temp gauge using the modified water outlet that allows the temp probe to be installed from the side. Routing is as already mentioned, follow the generator wire and through the terminal box. My repro gauge is mounted under the speedometer using one of the mounts available from the vendors.
One very annoying issue is that I cannot torque the head nut that is just below the temp probe, without draining the cooling system and removing the probe. Did I mention that this is very annoying??.
There isn't enough vertical clearance to use the thin walled craftsman socket with the probe installed and the special Snap-On S-8663-A tool won't fit between the nut and the side wall of the outlet. If I ever remove the outlet I will open that up a bit but until then...
Now not all modified outlets may have this problem, and I don't really remember where I got it as it was several years ago. But it might be worth checking out before installing a modified outlet.
See pictures.
Thank you for that comment. I have been railing against the stupidity of whomever designed that neck for years. I'm in disbelief that they are still sold.
I use an original style neck and drill and tap a hole at the rear. If done properly, there is no interference with anything else. Why the heck did they not do it that way - maybe the designer had never seen a Model A engine.
Y-Blockhead
Well-known member
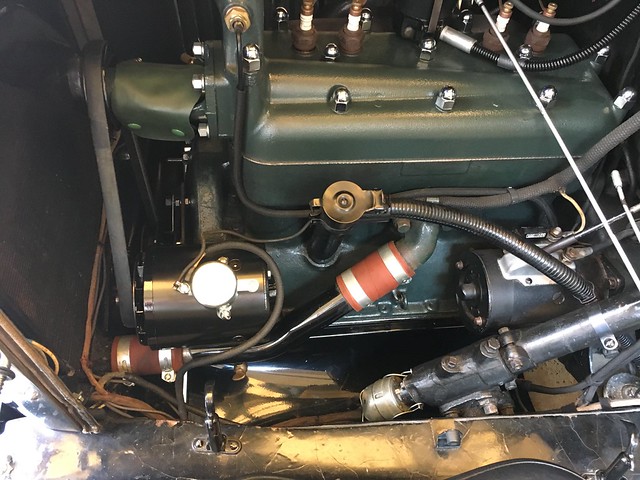
Y-B - that is a gorgeous engine compartment! Acorn nuts on the head, no less. I'm jealous.
JayJay
Thanks JayJay. Makes 'em easier to work on when they're clean.
rich40701
Senior Member
Jim, something you might want to be careful about when running the line through the terminal box and if it is metal. Keep in mind the two screws that hold the cover on are also what the wires hook to and are hot. I didn't like how the previous owner had ran the sender wire and changed it only paying attention to the looks. The first time I fired it up the gauge no longer worked and I couldn't figure out why so after driving it a couple months I decided to take the sender bulb loose to see if there was an issue there. While taking the bulb loose I noticed smoke coming out of the terminal box and with an ole F*** I quickly disconnected the battery. I removed the cover and discovered the sender metal wire had shorted across the two screw post and burnt the wire into and that is why the gauge no longer worked. Luckily the wire had initially burnt out quickly and didn't cause any other damage but when I started moving it around taking the bulb out it touched again causing the smoke to escape out of the wires. There is now a piece of rubber covering that area; you don't want to be making smoke in the terminal box.