
You are using an out of date browser. It may not display this or other websites correctly.
You should upgrade or use an alternative browser.
You should upgrade or use an alternative browser.
Rear spring spreader
- Thread starter Pa Joe
- Start date
I agree with Tom 100%
Its just not worth the material and time to do your own
I am nearly complete in restoring my Father in Laws 1930 pickup
We could not proceed without that rear spreader.
My Father inlaw is a make it yourself kind of guys
Thats great and he does a great job
1 inch away from the shackles and the home made spreader bent
Nothing happened but it was a message
Snyders has the Heavy Duty spreaders cheap. Shipping is lightening fast
2 days after we used the spreader we have 2 guys waiting to buy it from us
Just a thought
My website for those interested in some pics of our bent spreader and the new one
http://teddyk1.wix.com/verlans-model-a
Its just not worth the material and time to do your own
I am nearly complete in restoring my Father in Laws 1930 pickup
We could not proceed without that rear spreader.
My Father inlaw is a make it yourself kind of guys
Thats great and he does a great job
1 inch away from the shackles and the home made spreader bent
Nothing happened but it was a message
Snyders has the Heavy Duty spreaders cheap. Shipping is lightening fast
2 days after we used the spreader we have 2 guys waiting to buy it from us
Just a thought
My website for those interested in some pics of our bent spreader and the new one
http://teddyk1.wix.com/verlans-model-a

Manager
Senior Member
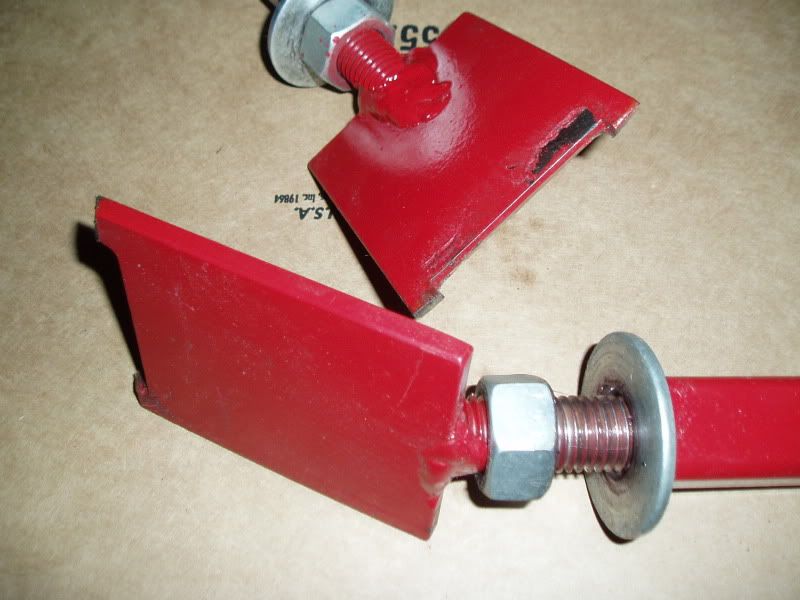
My spare rear spring is buried in my plastic garage that caved in from the snowstorm the other day, but here are some measurments of the spring spreader I made. Remember, it looks just like the one Tom Endy pictured, except I used 1" square tubing.
The 1" square tubing is 30" long with a 12" brace welded across the middle. Each threaded rod is 12" long and cut at an angle for welding to the steel plates. The steel plates measure 3" wide and 3 3/4" long with about another 3/8" stub left at the corners to lock into the sides of the spring. Notice how I ground the ends of the plate and stubs at an angle to fit the spring.
The 30" square tubing was heated red hot in the center and bent to a 30* angle. The 12" brace is cut at a steep angle on each end to fit against the 30" bent tubing. If I pull a string tight to the bottom of the ends of the bent 30" square tubing and measure up to the bottom of the 12" brace I get 2 3/8". The string measures 28" from one end to the other end of the bent tube.
The 12" threaded rods are cut at an angle and the steel plates are welded to them at a 27* angle. Installed in the square tubing, with the nuts all the way collapsed the end to end measurement is 38".
It took some time to measure and figure the angles to make sure the spring spreader would fit the installed spring, then collapse enough to be removed when off the car. Hope this is enough information so you can make one. If you need more information or pictures, just ask.
About to use this as a guide to make one. Anything you would change Tom seeing as this was 4 years ago and you have no doubt used it a few times. Thanks, John.

Tom Wesenberg
Well-known member
It's worked fine for me. As I recall, I used 3/4" threaded rod and 1" square tubing. You might like to use 1" threaded rod and 1 1/4" square tubing, as the added strength would be more safety margin.
Manager
Senior Member
It's worked fine for me. As I recall, I used 3/4" threaded rod and 1" square tubing. You might like to use 1" threaded rod and 1 1/4" square tubing, as the added strength would be more safety margin.
Your still alive so the 3/4 must be adequate.

Tom Wesenberg
Well-known member
Yes, but barely adequate. Be sure to grease the threads. A thrust bearing would be even better, but isn't needed.

Pete
BANNED
Seems no one has ever heard of Porta-power's.
They can be had on Ebay for around $40.
15 minutes to build an adapter for spreading springs and you probably have the safest way to spread a Ford spring.
No wrenching or twisting of the spreader while under tension. Just pump the handle.
The adapter is 3/8 steel with bungs welded on each end to take the Porta-power extensions.
It is asymmetrical because the jack goes on one end.
They can be had on Ebay for around $40.
15 minutes to build an adapter for spreading springs and you probably have the safest way to spread a Ford spring.
No wrenching or twisting of the spreader while under tension. Just pump the handle.
The adapter is 3/8 steel with bungs welded on each end to take the Porta-power extensions.
It is asymmetrical because the jack goes on one end.
Attachments


MrBruce
Senior Member
I agree, I have always wrapped a chain around even a good spring spreader. Most dangerous procedure on a Model A. Even guys who pull the complete assembly out with the spring attached should put clamps around the spring. If that center spring bolt broke it would send the spring parts flying. I have the utmost respect for the Model A rear spring.

Glen in Hillman MI
Senior Member
back one is just as easy just one side at a time use one bolt head on banjo with one end make other end like front works great
If you use this type replace bolt with a longer stud for safety.

Railcarmover
BANNED
Schedule 80 tubing,1 inch all thread grade 8,3/8ths 'knives'...works like a champ.on the tubing weld I triple stitched 1/8th 7018 on the tension side,single stitched the compression.full single stitch burn on knive to all thread joints.

Railcarmover
BANNED
Yep,might spend a little more time on it with guide collars so the screws are aligned in the tubing..No flexing whatsoever,Id give it a try with a ten leave pack.

Mikeinnj
Well-known member
bad link............
Mikeinnj
Well-known member
i followed the instructions as per: http://www.icehouse.net/overland/springspreader.html and it worked perfectly, plenty of grease to lubricate the moving sections.
bad link.....
Mikeinnj
Well-known member
"How To Restore Your Model A" Volume 3 by MAFCA page 110-111. Complete instructions with blueprint for a heavy duty and safe rear spring spreader.
I made one from the blueprint and have used it many times for over 29 years.
I would not use anything less than this heavy duty spreader.