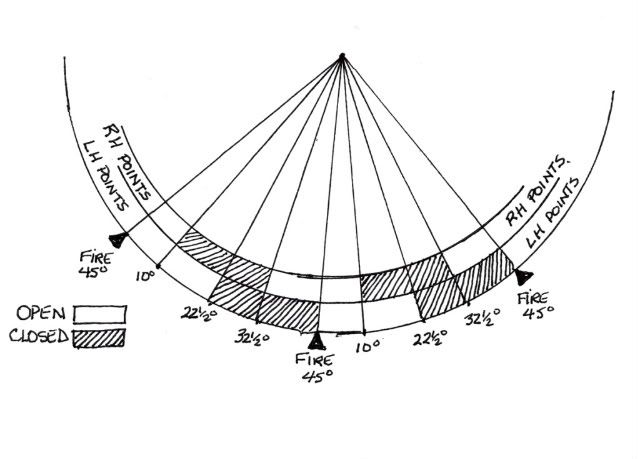
To understand the dwell scale, you must understand what you are trying to "set"/"adjust" in your distributor.
Without a huge amount of theory, you are looking for each set of points to be open for 22 1/2 degrees ... then closed for 22 1/2 degrees. The degree scale indicates when they are open/closed. It does not matter where the scale is positioned as long as you can read the degrees of open/close.
In other words, if the points open at 10 and close at 32 1/2 ... that's 22 1/2. The scale does not have to move ... I have an older model that did not originally have a degree scale; I added one that does not move, and it works great.
By the way, the original instructions are confusing and spend more time talking about slot A, bolt b and index c .... and never telling you what you need to understand.
So, the steps are, in this order:
1. Slip a bit of paper/card stock between the right-hand points to prevent them from closing ... work on the left-hand points first and set them to be open for 22 1/2 degrees (and closed for the same). Put the degree scale in any position that is easy to read.
Note: There will be some slop in moving the fixture wheel back and forth. Move it far enough each way to eliminate this. Also, I prefer to use a ohm meter with a beeper rather than the fixture light.
2. Set the advance using the adjustment index on the side of the distributor so that the points open when a "firing line" (F) on the fixture wheel aligns with the "index" on the fixture.
3. Move the paper/card stock block from the right-hand points over to the left-hand points and use the same procedure to set the right-hand points to 22 1/2. You do not have to reset the advance.
Here's a visual: