Ignition Coil

You should connect the "+" side of the coil to the "I" or "coil" (depending on how it is labeled) terminal on the ignition switch.

What should I do with the resistor under the dash? Disconnect it and jump the two wires together? And can I still use the one wire start button, or do I have to do a two wire?
 
The old single terminal solenoids had an internal relay coil connection to the bat side of the starter relay so the outside small terminal was the ground for the relay start function. The starter push button grounded the terminal and functioned the starter. Most modern types are internally grounded on one side of the relay coil so they need 12-volt power to energize the relay and starter. Most modern cars just have a twist to start ignition/start switch so they provide the 12-volt power to the relay during start function.

If you use a starter button, it will have to provide 12-volts to the relay for it to provide start function as was mentioned previously.

With a modern coil set up to use straight 12 to 14-volt DC, you don't need a ballast.
 
You should connect the "+" side of the coil to the "I" or "coil" (depending on how it is labeled) terminal on the ignition switch.

That is not correct for an interal resistance coil. In that case the I terminal is not used.
 
That is not correct for an interal resistance coil. In that case the I terminal is not used.

JSeery is correct.........do not use that "I" terminal!

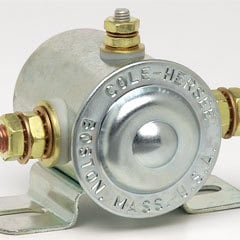
Here's what I would do, FWIW. I'm assuming that you still have the pushbutton to activate the starter as original. If so, that solenoid you have there is the WRONG animal. Throw it in the round can. Go to O'Reilley's and purchase the Cole Hersee 24060 12v solenoid like in the link below. It is a 12v version which is configured (wired) identically to the original Ford 6v solenoid. Incidentally, IF you had an original 6v Ford solenoid, it would likely function perfectly-well on 12v for years. Once you mount your NEW solenoid, hook-up the large cable to the starter on the CORRECT large lug. From the small terminal sticking out the front of the solenoid, run a wire to your original START button. All the button does is ground the end of this wire to the dashboard when pushed. By grounding this wire, it energizes the coil inside the solenoid which pulls-in the solenoid plunger to pass current directly from the battery to the starter.

When you hook-up the cable from the POS post on battery to your solenoid on the OTHER big lug, also connect (on that same lug WITH the battery cable) the wire that will feed 12v to your ignition switch (since your coil will be internally resisted).

To answer your earlier question, yes....you should jump the under dash resistor, so that in effect you will have 12v connected straight from the battery lug on solenoid, straight to the incoming connection point on your ignition switch. Hope this is clear enough. DD

http://www.oreillyauto.com/site/c/d...-1_-1&mn=Cole+Hersee&mc=CH&pt=N5094&ppt=C2428

24060-1.jpg
 
JSeery is correct.........do not use that "I" terminal!

Here's what I would do, FWIW. I'm assuming that you still have the pushbutton to activate the starter as original. If so, that solenoid you have there is the WRONG animal. Throw it in the round can. Go to O'Reilley's and purchase the Cole Hersee 24060 12v solenoid like in the link below. It is a 12v version which is configured (wired) identically to the original Ford 6v solenoid. Incidentally, IF you had an original 6v Ford solenoid, it would likely function perfectly-well on 12v for years. Once you mount your NEW solenoid, hook-up the large cable to the starter on the CORRECT large lug. From the small terminal sticking out the front of the solenoid, run a wire to your original START button. All the button does is ground the end of this wire to the dashboard when pushed. By grounding this wire, it energizes the coil inside the solenoid which pulls-in the solenoid plunger to pass current directly from the battery to the starter.

When you hook-up the cable from the POS post on battery to your solenoid on the OTHER big lug, also connect (on that same lug WITH the battery cable) the wire that will feed 12v to your ignition switch (since your coil will be internally resisted).

To answer your earlier question, yes....you should jump the under dash resistor, so that in effect you will have 12v connected straight from the battery lug on solenoid, straight to the incoming connection point on your ignition switch. Hope this is clear enough. DD

http://www.oreillyauto.com/site/c/d...-1_-1&mn=Cole+Hersee&mc=CH&pt=N5094&ppt=C2428

24060-1.jpg

V8COOPMAN, that was easy to understand. I just ordered that part from O'Reilley's. They were trying to sell me a Borg Warner one and I told them NO. I'm really looking for to getting this Ford back on the road.
 
V8COOPMAN, that was easy to understand. I just ordered that part from O'Reilley's. They were trying to sell me a Borg Warner one and I told them NO. I'm really looking for to getting this Ford back on the road.

Rustedjunk...........When you go to "jump" your under-dash resistor, it would actually be easier to merely connect your 12v wire FROM the solenoid onto the same connection on the resistor that is already connected TO the ignition switch. As can be seen in the pic, the resistor has TWO connector lugs. Just run both wires to the SAME lug.....resistance will be by-passed, and you will have 12v straight to your ignition switch!

64-14615.jpg


When you go to wire-up the solenoid, if the two large lugs are not marked, you can determine which one goes to the POS battery post. The large lug connected to the battery will be COMMON (electrically connected to) with the SMALL post that is for your starter button wire. You can determine this commonality or continuity by checking with an ohm meter. One of the large lugs SHOULD show continuity with the small lug. That is the LARGE lug that the POS battery cable will be hooked to (it is also the one that you will hook your small 12v ignition wire to). The large lug that DOES NOT show continuity with the SMALL, center post will be the lug that is cabled to the starter motor. DD

Where do I get this part from? I need to see pictures or a diagram on how to do this. A drawn wire diagram or something. My brain is literally fried.
 
This is very simple wiring. Using the suggested relay and the single terminal pushbutton starter button here is a diagram. The fuse block shown is already on your car, however in your case it is a circuit breaker panel in place of the fuse panel. I'm not sure of the exact one in your year, but it should look something like one of these.
 

Attachments

  • Wiring Diagram.jpg
    Wiring Diagram.jpg
    39.5 KB · Views: 32
  • Fuse 01A-12250-breaker-resistor.jpg
    Fuse 01A-12250-breaker-resistor.jpg
    89.4 KB · Views: 12
  • circuit breaker panel.jpg
    circuit breaker panel.jpg
    19.1 KB · Views: 164
Last edited:
Do you have the original wiring diagram to look at? IF you use the three terminal starter solenoid the only thing that really changes is the wiring at the ballast relay on the circuit breaker panel. All you need to do is move the wire from one end of the ballast resistor to the other so that both wires end up on the same terminal.
 

Attachments

  • Flathead_Electrical_wiring1946-48car.jpg
    Flathead_Electrical_wiring1946-48car.jpg
    93.9 KB · Views: 6
  • 46 wiring diagram.jpg
    46 wiring diagram.jpg
    81.6 KB · Views: 167
Last edited:
Where do I get this part from? I need to see pictures or a diagram on how to do this. A drawn wire diagram or something. My brain is literally fried.

Rustedjunk............Slow down! Don't burn-out the brain. JSeery above gave us some pretty good info to go from. That generic picture I used above for the resistor is a very early one....NOT like your '47......SORRY! The pic below is more like what your '47 should have under the dash.

320050


Before we go any farther, do you have a contraption like this under your dash? IF you DO, we'll use the schematic below and go from there. Let us know if you have an assembly like the one just above under your dash. DD

Flathead_Electrical_wiring1946-48car.jpg
 
Damn that JSeery is GOOD! He's already got your car running and rarin' to go! He has it all wired-out for you here if you can find that resistor panel under your dash. Let us know! If you need help interpreting Seery's drawing below, we can help you. DD

320053
 
Rustedjunk............Slow down! Don't burn-out the brain. JSeery above gave us some pretty good info to go from. That generic picture I used above for the resistor is a very early one....NOT like your '47......SORRY! The pic below is more like what your '47 should have under the dash.

320050


Before we go any farther, do you have a contraption like this under your dash? IF you DO, we'll use the schematic below and go from there. Let us know if you have an assembly like the one just above under your dash. DD

Flathead_Electrical_wiring1946-48car.jpg

I have that same contraption under the dash, though the little resistor off to the left is missing.
 
Thank you ALL for your help. A special thanks out to V8COOPMAN, JSeery, and Bubba! I was able to get my 47 back on the road and to the Back to the 50's Car Show at the Minnesota State Fair Grounds.


Glade to hear you got it fixed! And thanks for the feed back, it is always helpful to learn what actually help solve a problem.
 
Back
Top