Horn parts diagram

Gooseloony

Senior Member
Going to attempt to clean/service my horn. I have searched the Barn until my eyes burn but can't seem to find a parts diagram and a condensed version of I should do for just cleaning and servicing (not rebuilding). By the way it's a Stewart Warner horn. Thank you for your help.
 

Attachments

  • 20141205_183135.jpg
    20141205_183135.jpg
    141.3 KB · Views: 212
  • 20141205_183237.jpg
    20141205_183237.jpg
    122.4 KB · Views: 174
On the horn you are working on, the armature end nut is left hand thread , so be careful. The search fucntion must have alot of information on there.
 
I searched but I can't find a diagram naming the parts. I read some of what others post but being new to Model A's I need to SEE what they're describing. I find it helpful when I can look at something (usually a diagram) while reading descriptions.
 
I looked at your photos, it's hard to tell, are the field winding's burn't? Does the horn work at all? Wiring to terminal block look's kind of cobby.
 
The horn works, it just doesn't give the loud ahuhga sound. thinking it's just needs a cleaning, lube and adjustment but being new to all this I'm trying to feel my way through various fixes on this vehicle.
 
That screw looks like an aftermarket full thread screw that can be screwed in far enough to touch the brush holder and short out. In fact in your picture it looks like there might be a circle where the screw touched the right brush holder.

When you blow the horn using a 6 amp battery charger, the amp meter should read about 5 amps.

To clean the armature I hold fine emory cloth against the commutator while it's spinning. This will clean and to polish the copper segments. Use a round wood toothpick to clean between the segments. There is a felt pad on each end of the commutator that takes a few drops of oil. If you remove the 6 assembly screws be sure the diaphram goes back in the correct orientation so the chisel point strikes the wavy washer correctly. I put a dab of grease on the wavy washer.

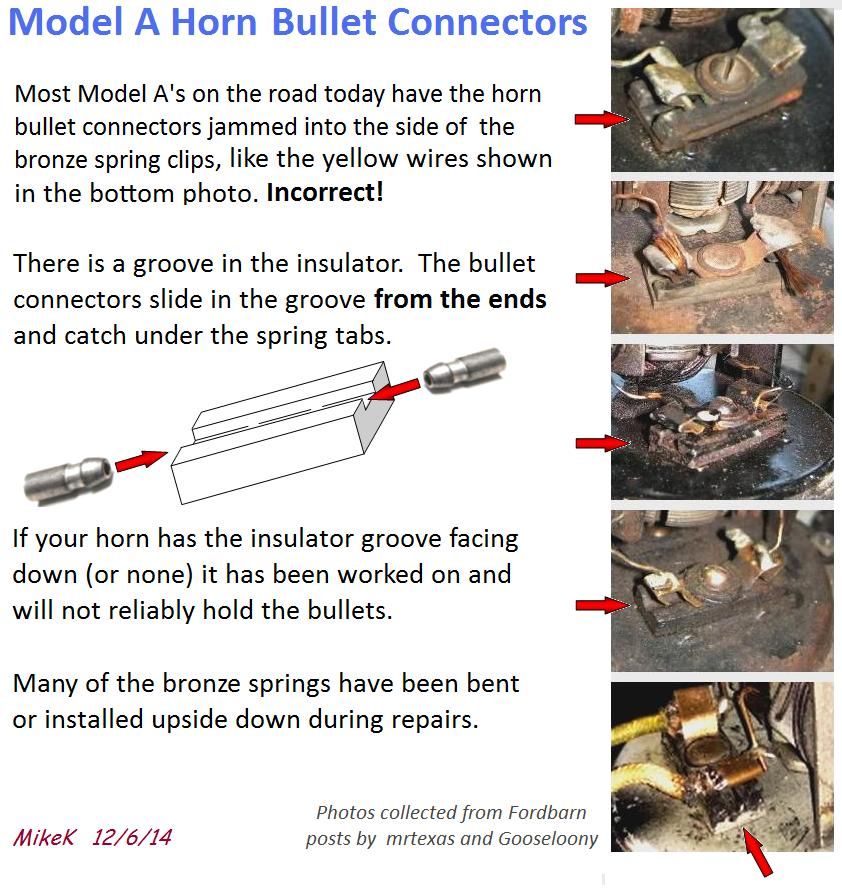
The two wires should have bullet terminals that push in from the folded ends of the copper contact strap, rather than be soldered in from the side. Each of the two brush holder screws should be a flat head screw with a cone shaped insulating washer under the screw head and another flat insulation washer between the brush holder and motor frame. The screw on the left in your picture sticks out, as though it's a pan head screw rather than a flat head screw.

Here's a thread about the Sparton horn repair.

http://www.fordbarn.com/forum/showthread.php?t=125818&highlight=horn+repair
 
Last edited:
The attached horn.pdf gives more information which includes cleaning and tuning. In addition, there is a printable diagram.

hornExplode.gif

armatureBracketExplode.gif
 

Attachments

Last edited:
Remember AAH-OOO-GAH is a 3 syllable word.....LOL! I had Jim Diehl rebuild a horn recently and he rewound everything and it is the best horn I have ever heard without the engine running.....
 
30ccpickup---exactly what I was looking for! Thank you all for the great advice and comments, they are all helping me (and others I'm sure) learn the tricks and nuances of these vehicles. I must say, I wish Tom lived next door to me (he may not)--what a wealth of knowledge!
 
If you do disassemble it, be aware that not all diagrams are correct.
The groove in the connector insulator does not face down. It faces UP!

HornConnectors.jpg
 
Thanks MikeK. I did not know this-great post. I always tried to put the wires in like in your first picture.
 
Back
Top