BUBBAS IGNITION
Well-known member
Been pretty busy this week working on Hemi stuff etc. Had a customer order a HEI for a flathead and thought i would share as my day went along.
Using one of our regular conversion and ading a few more minutes on the lathe for the HEI addition. I cut the top ring down for module clearance and assure a complete flatspot to mount the module flat etc.
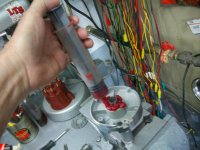
Using a HEI control module (from speedway motors) complete with the harness ( also use the harness wiring etc. a plus). Locate and mount with two 8/32 allen screws and module heat grease on lower plate.
Lube upoper bushing cavity,install new seal and upper breaker plate. Note we use a vacuum block off with no vac advance on this unit. Vacuum may be used if desired ! We use a 78 dodge v8 reluctor machined to press fit the chevrolet distributor cam aligning the teeth with the high points on cam.
Shaf and cam are assembled with cap. Mark cap wire positions for indexing the pick up coil. With rotor installed pointing at a single mark , position pickup with one of the teeth on the reluctor. Mark and drill 8/32 hole for hold down screw. ( we will verify rotor phase on machine using a cap and timing light)
Install new flathead drive gear and cut shaft allowing unit to be used on merc and standard covers. This will now use a low ohm coil ( .5-.6 ohms) and is shown at 5000 rpm at 45,000 volts.
Cover screws are used to hold distributor in cover and its off to a happy customer.....


Questions.......???????
Using one of our regular conversion and ading a few more minutes on the lathe for the HEI addition. I cut the top ring down for module clearance and assure a complete flatspot to mount the module flat etc.
Using a HEI control module (from speedway motors) complete with the harness ( also use the harness wiring etc. a plus). Locate and mount with two 8/32 allen screws and module heat grease on lower plate.
Lube upoper bushing cavity,install new seal and upper breaker plate. Note we use a vacuum block off with no vac advance on this unit. Vacuum may be used if desired ! We use a 78 dodge v8 reluctor machined to press fit the chevrolet distributor cam aligning the teeth with the high points on cam.
Shaf and cam are assembled with cap. Mark cap wire positions for indexing the pick up coil. With rotor installed pointing at a single mark , position pickup with one of the teeth on the reluctor. Mark and drill 8/32 hole for hold down screw. ( we will verify rotor phase on machine using a cap and timing light)
Install new flathead drive gear and cut shaft allowing unit to be used on merc and standard covers. This will now use a low ohm coil ( .5-.6 ohms) and is shown at 5000 rpm at 45,000 volts.
Cover screws are used to hold distributor in cover and its off to a happy customer.....
Questions.......???????