'36 Brakes Still Don't Work...

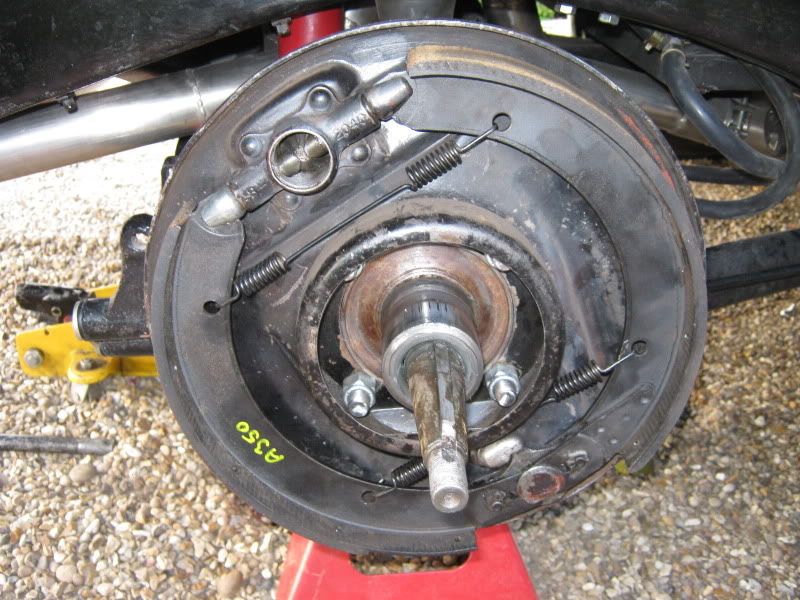
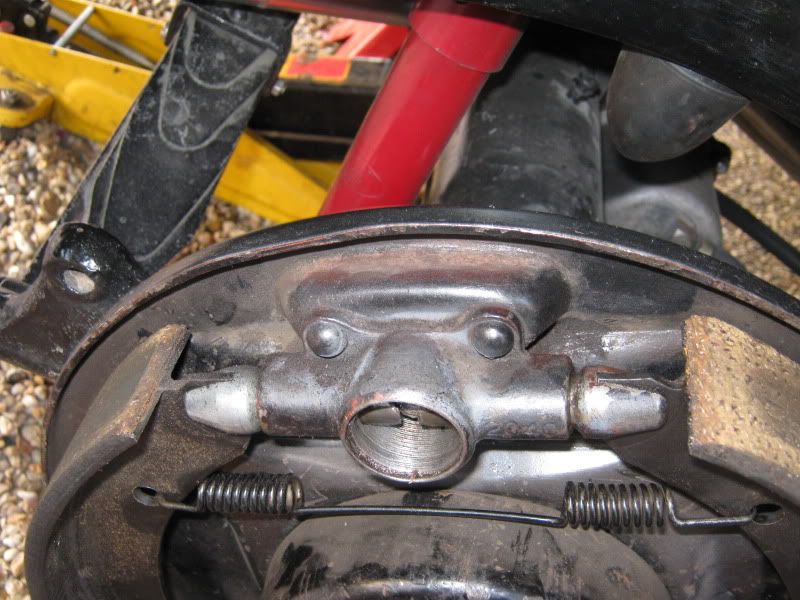
I took a couple of Ford script brake shoes and layed them out and adjusted the diameter to 12" this is what they look like. A nail would not fit in the location you have inserted one with the retracting springs attached without forcing it in place. The brake shoe link 48-2042 has the brake shoe backing plate bottomed out. the two upper inside edges of the backing plates appear nearly parallel.
 

Attachments

  • DSC01813.JPG
    DSC01813.JPG
    60.9 KB · Views: 51
  • DSC01814.JPG
    DSC01814.JPG
    60.9 KB · Views: 38
Well, just to jump in with another angle. On my 36 I tinkered with the brakes chasing a chattering problem for a couple of months. Found a used cross shaft at the Charlotte meet and had it rebuilt by an Amish machine shop.

They turned a new shaft and new bushings. That took all the play out of the whole assembly. When we installed it we found a lot of wear on the clevis pin that connects the rear rods to the cross shaft, and replaced it.

After the rebuilt cross shaft was installed the brakes were as close to perfect as practically possible. They stop straight ahead with smooth action and good pedal. (All stock no floaters) So I'm a believer in rebuilding the cross shaft. I think I saw a brief mention that you had done this, but if not I really recommend it for good brake operation.

BTW if anyone is interested I am having my my original cross shaft rebuilt and it will be available if someone needs one. I could bring it to Hershey.
 
Now this is intersting about the shoes.

I pulled the front drums again today to check the suggestion that the shoes and been reduced in length.
Well they have been, by alot in some cases and they have been cut down differently from left to right as well!

I've pulled the rear drums to check the brakes and their perfect just as they should be.

IMG_0300.jpg


IMG_0301.jpg


The rears as I've posted before have always fitted right, felt right and worked right.
The fronts on the other hand have always been the complete opposite and all tracable back to the ill fitting shoes.

The other wierd thing is how all the bad shoes have ended up on the front?
I've never made any effort to keep when to the corners they was removed from and have been mixed up several times.
Murphy's law?

I think this is the reason I never spotted the difference in shoes because they have never been side by side on the car.

Tomorrow will hopefully bring the fronts back into spec using the rears as a template.

Wish me luck.:D
 
I know you may not want to hear this at this point. I had a similar problem with my 35 that I want to keep stock. I added brake equalizers and the problem went away and she stops as good as my 39 does. Frank pkny
 
I'm not sure are on track here.There should be long shoes on both front and back.If the backs work leave it alone.You need a new set of shoes,full NO open rivet holes.The bottom camfer is the importent one.The backs are wrong shoes.
 
Good that you seem to have found the problem. One thing is evident, looking at your photos, and Lars has pointed it out; when you assemble this all again, apply some lube to all moving parts, your entire brake mechanism is dry as a bone! This will certainly help matters. Brian
 
As frank said I would put the floaters back, and if you don't want to get into the welding I would make up a wedge to go were the nail is 3/16 wide out of 1/8 stock ./flat Barr with a head something like a I or H . I looked over our instuctions and apart from a couple of typos I wouldnt say they were full of errors ,But we could add some more info in the light of your problem .You can contact me if you need to .


I know you may not want to hear this at this point. I had a similar problem with my 35 that I want to keep stock. I added brake equalizers and the problem went away and she stops as good as my 39 does. Frank pkny
 
Looking at your top photo again you can see were the head of the adjuster link is almost touching the adjuster housing ,This I have already explained in the previous photos with the arrows. There is no way floaters will work ,unless you weld the inner ends of the adjuster link on the angle piece .or replace them with new ones . You could go for the H/I option you will need to grind a little of the housing ends ,this is all to get free movement at the top .It need to move about 1/8 either side .Even if they were on the front they will make a lot of difference .
 
Good that you seem to have found the problem. One thing is evident, looking at your photos, and Lars has pointed it out; when you assemble this all again, apply some lube to all moving parts, your entire brake mechanism is dry as a bone! This will certainly help matters. Brian

They were all greased at one time. Its all been on and off so many times now theres none left!

As frank said I would put the floaters back, and if you don't want to get into the welding I would make up a wedge to go were the nail is 3/16 wide out of 1/8 stock ./flat Barr with a head something like a I or H . I looked over our instuctions and apart from a couple of typos I wouldnt say they were full of errors ,But we could add some more info in the light of your problem .You can contact me if you need to .

when I said errors I meant gramatical and puncuation. The information is there but its very differcult to read.

Looking at your top photo again you can see were the head of the adjuster link is almost touching the adjuster housing ,This I have already explained in the previous photos with the arrows. There is no way floaters will work ,unless you weld the inner ends of the adjuster link on the angle piece .or replace them with new ones . You could go for the H/I option you will need to grind a little of the housing ends ,this is all to get free movement at the top .It need to move about 1/8 either side .Even if they were on the front they will make a lot of difference .

The links are almost touching the housing because the adjuster is wound completely out so I could pull the rear hub off.
They would sit further out when adjusted.
 
OK ,The Model A instructions are more detailed because they have been discussed a lot more,There is room for more detail on the v8 ones ,Put the floaters back on while you have all the advisers here.
 
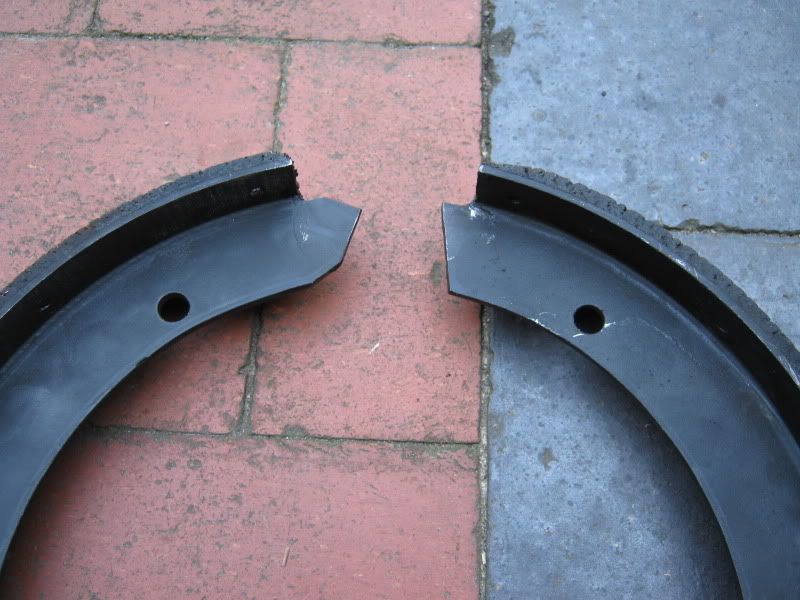
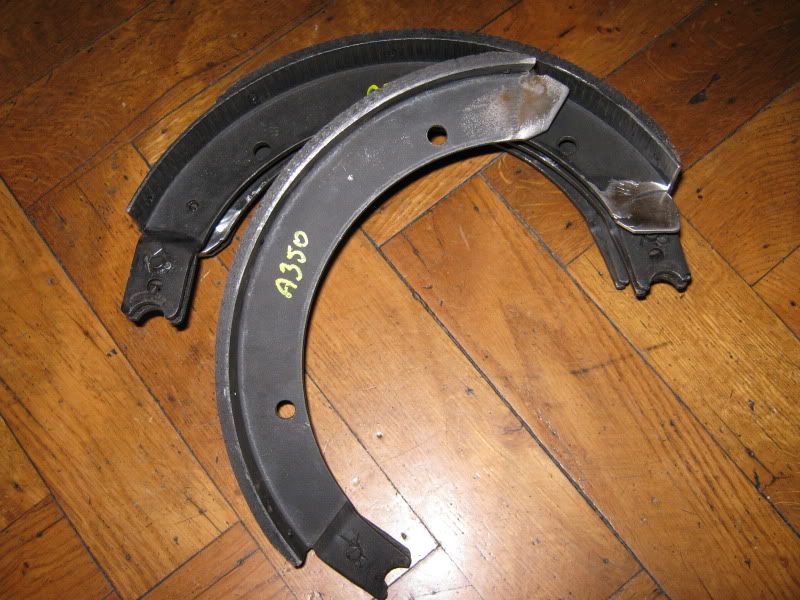
Heres a picture of my shoes.

The left came from the rear which works and is how it should look. The shoe on the right is what came off front. As you can see someone has got real happy with the saw and removed 1/2" of shoe!
This is the same for all 4 shoes on the front.

IMG_0303.jpg


The only explanation I can think of for doing this is that at some point in the past the brakes that these shoes had been with had some sort of backyard hydraulic conversion that involved shortening the shoes so they would fit into a brake cylinder.
Now they've gone full circle and ended up back on mechanical brakes.
 
Even though they are cut short they may not be the coarse of the judder .The 32 shoes I refer to with short lining (sent to me to solve the same problem )I set these up in the front of my 34 ,as explained the rear shoe full lining at the bottom to see how they would work .They were Ok going forward but on reverse shuddered real bad ,This shows you that short lining doesn't work .this noise is the front edge catching and vibrating .As the shoes ware in it may disappear .The other thing I notice about your backing plate it sits at 2.0 and 8.0 o clock ,instead of 9 & 3.0 Ted
 
Even though they are cut short they may not be the coarse of the judder .The 32 shoes I refer to with short lining (sent to me to solve the same problem )I set these up in the front of my 34 ,as explained the rear shoe full lining at the bottom to see how they would work .They were Ok going forward but on reverse shuddered real bad ,This shows you that short lining doesn't work .this noise is the front edge catching and vibrating .As the shoes ware in it may disappear .The other thing I notice about your backing plate it sits at 2.0 and 8.0 o clock ,instead of 9 & 3.0 Ted

They may not be the problem. But there is no denying that they are way off the mark of being right also.
I'm trying to change one part at a time so I can keep track of what is working and what isn't.
If this doesn't work then I'll move onto the next part which may well be the short linings.

I'm not following with what parts you are refering to that are at 2 and 8? The closest parts to these points are the centre of the shoes?
It is impossible to get the shoes in a 3 and 9 position.
Moving the back plate one hole would put the shoes at a 4 and 7 position. It wouldn't matter anyway because nothing would line up or fit anymore. I know I've tried.
Also the Green Bible shows the exact same fitment and orientation as mine.

I think if the lining were reversed the cut one to the back it may have worked better.The 35 36 when changed to wider shoe they centered better to float and the cut was to make it slide better that would be the rear shoe.I would put the repaired to back,but think the short lining is not good in front.If all else fails get a new set of full linings.
 
The repairs look good you are on your way .The 2 & 8 o'clock was the backing plate ,I checked out my 35 and you have it right ,its my error.
 

Attachments

  • piaroa 064.jpg
    piaroa 064.jpg
    76.6 KB · Views: 11
Holy Cow! I just went through my windshield!!

Re-assembled my brakes with the repaired shoes and Teds floaters back in. Immediately stuff was going back together as it should on the front better than it ever went together before. None of this don't look/feel right.
Things were looking up.

Took the car out and WOW, it stands on its nose and stops with no fuss or drama or shoe chatter!
I would even go as far to say it stops better than my modern!

BIG THANKS TO EVERYONE, especially Ted and George/Maine for the constant supply of ideas.
 
Great news Clark!!

with all this talk and knowledge... my ol 35 might not see these Lincoln brakes I bought for it... :rolleyes:


Holy Cow! I just went through my windshield!!

Re-assembled my brakes with the repaired shoes and Teds floaters back in. Immediately stuff was going back together as it should on the front better than it ever went together before. None of this don't look/feel right.
Things were looking up.

Took the car out and WOW, it stands on its nose and stops with no fuss or drama or shoe chatter!
I would even go as far to say it stops better than my modern!

BIG THANKS TO EVERYONE, especially Ted and George/Maine for the constant supply of ideas.
 
Emblock that's good News ,just make sure you keep the movement at the top 3/16 to 1/4 by keeping them adjusted.Ted
 
CONGRATULATIONS!!!!!!!!! I love these long threads because so much information is exchanged by so many people, and that's what makes this a great site. JMO
Paul in CT
 
Back
Top