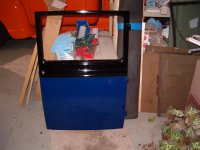
Door skin patch panels...

PeteVS

Well-known member
I got a pair of patch panels for the doors ('32 Tudor.) I didn't realize that they'd come as flat panels. Looking at the door, it appears to have a compound curve in that area and I'd assume that a bit of stretching would be in order. Am I correct here, or will the flat panel sort of naturally find their way as they're installed? Thanks for any help or pointers with this!!
 
I believe the 32 door is similar to the 30 tudor doors. Here is my build up. Zeke
 

Attachments

  • Door rebuild 002.JPG
    Door rebuild 002.JPG
    128.4 KB · Views: 174
  • Door rebuild 004.JPG
    Door rebuild 004.JPG
    123.1 KB · Views: 164
  • Door rebuild 005.JPG
    Door rebuild 005.JPG
    123.4 KB · Views: 158
  • Door rebuild 006.JPG
    Door rebuild 006.JPG
    125.1 KB · Views: 160
  • door repair 1 003.JPG
    door repair 1 003.JPG
    116.2 KB · Views: 171
  • door repair 1 006.JPG
    door repair 1 006.JPG
    124.8 KB · Views: 161
  • Painted 001.JPG
    Painted 001.JPG
    115.8 KB · Views: 154
OK- The Model A door is curved in a vertical plane (going top to bottom.) Is it curved in a horizontal plane (going front to back?) If it is curved, did you have to do any hammering to get it to follow the curves, or did it curve it self when you got it "anchored" on all four sides?
 
Last edited:
Pete I just got a set on ebay from the manufacturer for 35-36 lower door patches. I was surprised also when I pulled them out the box and they were flat!! They claim their door bottom patches are the best available made in USA. So I'm looking forward to see everybodies responses to this. I really only need the bead and bottom edge and thought if I cut the patch just above the bead it may be reasonably easy to shape to the correct shape of the door.
 
Pete, I put a set on my 5 window and I just curved them to fit the inner panel, they didn't need to be stretched just curved. I only had to use the bottom bead up about 3 inches. I was also surprised when I saw they were flat but the bead was correct just need curved. Hope this helps, Dale.
 
If it is short enough up off the bottom it can be carefully welded to the buttline that will form the curve then metal worked after welding as long as there is access to the rear of the panel. If more of the door skin farther up the body line needs to be replaced, it would require forming of at least 90% of the compound curve to get it to work. The less the manufacturer has to do to form a particular panel, the cheeper they can sell it and still make profit. Many of them could care less if it actually fits or not.

Much of the sheet metal patch material sold today is not what i would call finish quality for fit or function. It will get a person in the ball park but it always needs some work during installation. It's getting to where you need a power hammer and an english wheel to fit any of this stuff. If a person had those kinds of tools around, they wouldn't need to buy patch panels.
 
I tussled with this problem when restoring my 32 truck. I ordered panels from several suppliers just to find that they were all the same, flat! My good buddy and restoration expert had a solution. We cut the door skin above the lower hinge, he bent a panel of 16 gauge steel over his knee and welded them in. He then bent a 1/8 strip of flat stock to match the curve and welded that to the bottom. Looks perfect. The curvature is perfect. No special tools!
 
Thanks folks! The drivers door has just a couple of small holes just above the crimp area. The passenger door has more serious damage and I made a lower half of the structural piece and I think I'll only need half of that. Guess I'll start with the easy side first and see how that goes. I'll try to get some pix for you.
 
OK- Got started today on the driver's door (the better of the two.) Here's a picture of the worst of the rust through.
smDSC02430.jpg

Patch measures about 7-1/2" high, but I figure I'll need about 3" to get to sound material. The 3" also puts the weld above the interior structural piece to allow hammer or dolly access to the back side of the weld. I also measured down from the bottom of the belt rail to the bottom of the door at three places.
smDSC02433.jpg

I cut it shy with a cutoff wheel and then trimmed it with aviation snips. I'm surprised that they work so well with the 18 gauge sheet.
smDSC02435.jpg

Here's what the bottom of the door looks like from the inside of the car.
smDSC02434.jpg

Here's the door with the cut made, wire wheeled, media blasted and hosed down with weld through primer. There's a lot of pebbling and a little bit of rust through but it won't be seen.
smDSC02438.jpg

I haven't taken pictures yet, but the panel forms very nicely to the contours of the existing panel and the flanges at the bottom of the door structure. Hopefully, tomorrow I'll get it clamped up and tacked.
 
Last edited:
PETEVS This is a very good approach to panel repair, use the least amount of the repair panel as possible to make the repair. In this case I think that this is even a little over kill for the door that you have pictured. Since the door only had a few minor pin holes the complete repair approach may make more work than necessary especially with a long horizontal weld seam. In the case of this door a small diagonal repair of the corner holes may have been easier and less time consuming. The remainder of the door could be leaded to fill the pin holes or even repaired by using epoxy plastics to fill the rusted area. Panel repairs like this require pains taking time in metal finishing and subject straight panels to excessive warping if overheated as well as ending up with more body filler than necessary to get the door back to straight. The panels for this repair easily conform to the contour of the door in this area and should not pose too much of a problem installing if you take a very slow approach to welding them in place working from the center outward,not excessively over heating the joint and warping the metal you should have a good result

Back to your original question about patchpanels. They are as they say they are, patch panels, intended to be used as patch material not complete repairs. Many of these panels are inexpensive pieces made for simple repair like the bead width or small rust repair however as the better donor parts are harder to find these patches have been used for larger and larger damaged areas that they were not originally intended for. There are door skins available from shops like Walden Metal Fabrications that hand form complete or partial door skins however it comes back down to price and I hate to say this but most people say they want Ferrari quality but when it gets down to purchasing only at Yugo prices and you can draw a conclusion as to why the present panels are made as they are.
 
Couple more photos. Don't have time to fire up the welder. Maybe Friday...
Anyway, this is the driver's door with the panel pretty well fitted up. Having a lot of fun trying to get the edges straight enough to have a tight fit to weld.
smDSC02443.jpg

This is the passenger door. It was a lot worse than the driver's. Photo shows what I cut out of the lower structural piece and the partial replacement I made for it. I plan to cut the replacement in half and use as much as possible of the original. (The recent R&C article on making a new '34 roadster dash helped a lot with making the part.)
smDSC02445.jpg
 
Hi all; Years ago I made and sold totally correct 32-34 truck door 1/2 skins, with both direction curves for $200 @. I was shut down by the flat CHEAP panels now being sold. Everyone bought cheap, so I gave up. Newc
 
Pete I just got a set on ebay from the manufacturer for 35-36 lower door patches. I was surprised also when I pulled them out the box and they were flat!! They claim their door bottom patches are the best available made in USA. So I'm looking forward to see everybodies responses to this. I really only need the bead and bottom edge and thought if I cut the patch just above the bead it may be reasonably easy to shape to the correct shape of the door.

I bought the patches for my 1/4s off epay for my 36. It was so much work to make them fit I would have saved time making them from scratch , they were very poor quality
 
I got lower door panels for my 35 from EMS. They were flat. EMS made the inner and outer tailpan perfect but I was surprised to see that the door panels left something to be desired.
 
Looks good so far, I patched my 31 truck doors that were worse then yours, and they came out ok. Getting the curve isn't that hard, making them NOT oil can was. I put a reinforcement on the inside, to keep the panel in place, my wife slams the doors!
 

Attachments

  • Shake down day for the red truck_1.jpg
    Shake down day for the red truck_1.jpg
    84.8 KB · Views: 13
Follow the link to my website to find out more about making up the patch panels.

A flat panel is not 'long' enough so you install the patch and between the shrink that will happen from the weld and the fact the panel is shorter it will pull the door out of shape. This can do more distortion then you might expect and you have to look at the other end of the door to find the distortion.

You must have the compound curve in the panel before you weld. You must continually correct for the weld shrinkage. Since you do not have an English wheel you will have to use hammer and dolly to approximate a compound curve. It does not have to be perfect, but something goes a long way to a panel that needs minimal leveling. My goal in putting a panel in is to just need a file and may be a little shrinking disk work (I also have a TIG welder which helps).

Done right and you will not need much more then a few coats of filling primer to level the door.

You will find the steps I took to make a patch for my 31 slant window door which is a close relative of the 32. In particular you will see how I needed to make a curved break to make the correct bend around to attach the bottom.

On my website I give some hints and places to go to learn how make great improvements in how you fabricate and weld in panels.
 
If you have a nice heavy metal top table or a large flat piece of steel plate, you can get a hammer to do the same thing an english wheel does. You just have to make a mental grid of the surface you need to curve and strike a blow in every square of the grid along the surface. If it doesn't start to curve you try to strike a blow between each square of the grid then repeat as necessary until you see a curve forming. You have to use a hammer with a small crown to start with.

Like any sheet metal forming procedure, it takes practice to get it down but it will work. Different shape hammer heads work differntly so you have to have a few different ones to play with to see what they do. It's just slower & more tedious than a E-wheel is.
 
So, it there a source of "where to hit to get the curve you want?" Kind of like hit here, here and here to get that end to bend up?? Or, do I have to play with a piece of scrap and see what happens? I'm kind of glad I haven't started welding yet.
 
The hammer blows will concave the surface slightly due to the curvature of the hammer head. A person would have to strike the backside of a door skin to get that side to start curving in their favor for a concave back side. I've even seen one instance where a person took a magic marker and marked a grid out on the surface so they could visualize where to start and work there way across the panel evenly without striking too many blows in one place or missing a spot. The only drawback to the hammer method is that the surface usually ends up having to be filed a bit with fine tooth body files or an air file to even any roughness out. An E-wheel leaves a nice smooth surface so very little metal finishing is required.

Soft steel body metal whether commercial grade 1010 and especially draw quality aluminum killed cold rolled steel sheet is soft enough that it will respond to any blow that you strike so a person doesn't need to be real aggressive with their hammering. If you stretch it too much, you will have to shrink it back. If it is commercial grade, it will take more blows than the DQAK does to get the curve. I don't know what a lot of these patches are made from but I know that some are even made from galvanized sheet and that stuff is harder than the commercial bright finish, oiled surface stuff is.

At least the short lower end of a door usually has the least amount of curvature in the whole skin so it won't need near as much work as a whole skin would to get the compound curve in there. If you already have the edges formed over the door structure, it will limit what you can do to it since you will only be able to work the areas that you can get to.
 
Back
Top