

Mart
Well-known member
6/17/12
Time for a change.
I needed some exhausts.
I hoped to cull a few systems from the local scrappy, but that didn't work out so out of desperation I looked on ebay. I just wanted something I could bang on there to allow me to run it and get an MOT and have it on there for de-bugging.
I decided I didn't want to buy lots of bends and stuff, so I wanted a system. I clicked buy it now and bought a couple of these:
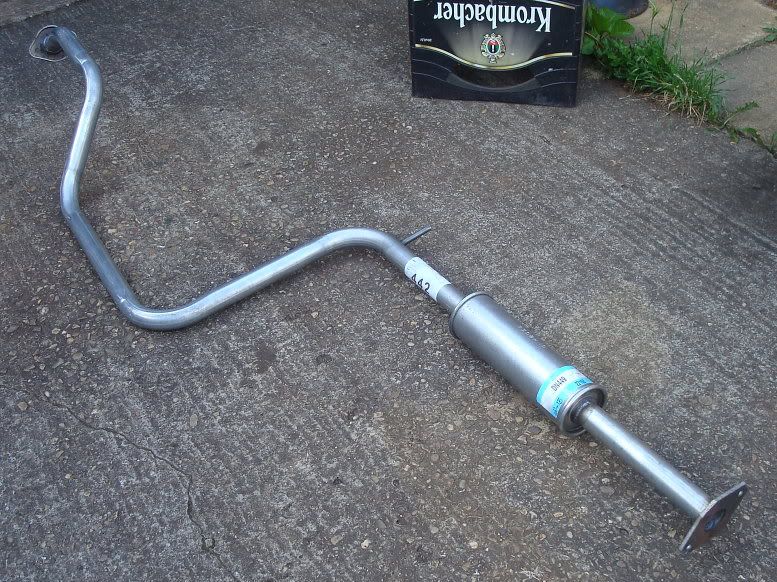
This is a mid section from a Nissan Primera. How un-hotroddy can you get.
There has been a balls up and I've got one, whatever happened to the 2nd one hasn't been settled yet.
But anyway, I got that one because it looked like it had some bends, some flanges, a silencer and some straight bits. I only had the image to go by, but it's for a 1600 engine, so shouldn't be too small.
Turns out it's 41mm dia, which is 1-5/8", which should be ok for a nice stock flatty.
Anyway, 10 minutes with the saw later:
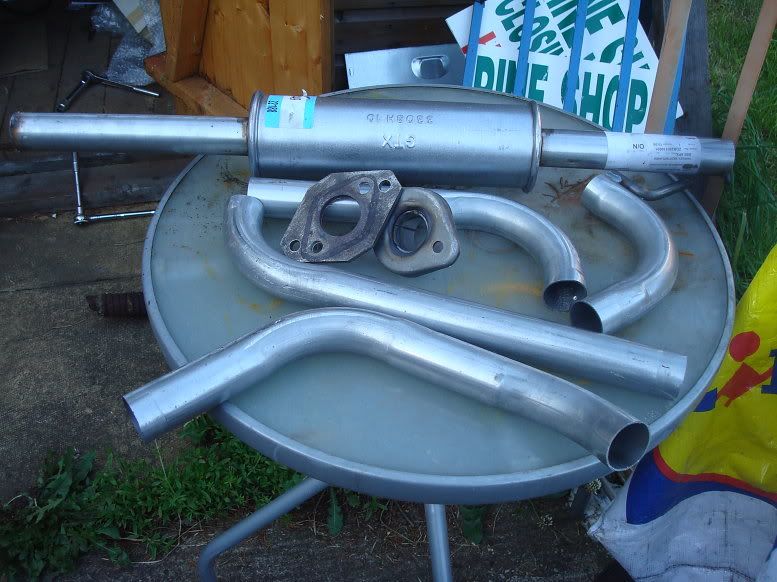
Cleaned up one of the flanges, and redrilled it to fit the flatty manifold, and started welding bits together.
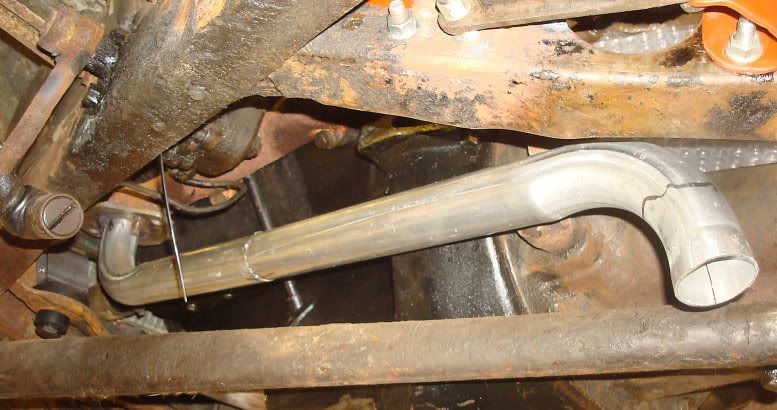
Hadn't really got enough tube, but did manage to come up with something that'll get 'er rolling.
It runs just below the frame, rather than through it, but hogs the middle, where the x-member dips low.
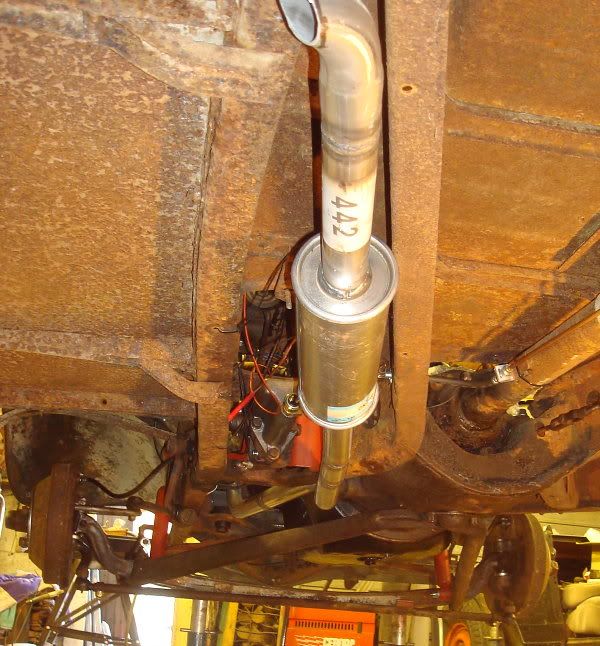
I just put little turnouts on because I was out of tube. I just need to but a little mount on the rear end.
This will do for now, just need to sort out the other side, a mirror image of this side once I resolve the issue with the seller.
I had also been looking at the top hoses and have ordered a pair of 180 degree silicon bends off the bay. I think I can use these with a bit of tubing in between.
That'll be it for a few days as I'm off to Belgium for a long weekend at the European hotrod and custom show in Chimay.
Can't wait.
Mart.
=============================================
07/02/2012
830
Mini update just to cross the I's and dot the T's.
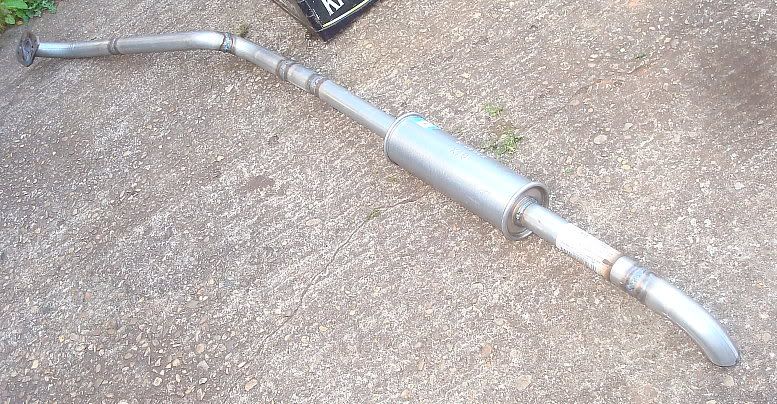
Bloody exhausts! I ordered two exhausts from one seller on ebay. Long story short, one arrived, so I made up the left hand exhaust on the car. Bit of to-ing and froing with the seller and the second one arrived the Monday after Chimay. Problem was, it was completely different! Bollocks! But I liked the look of it better, the pipes were bigger, and the silencer a nicer (bullet) shape. I made up the right hand side, and as it was the second go around, it came out simpler and better. I was pleased with that one, so I just ordered another one from a different seller, making sure the manufacturer and part number matched. The re-do of the left side went quickly and easily and I'm pleased overall.
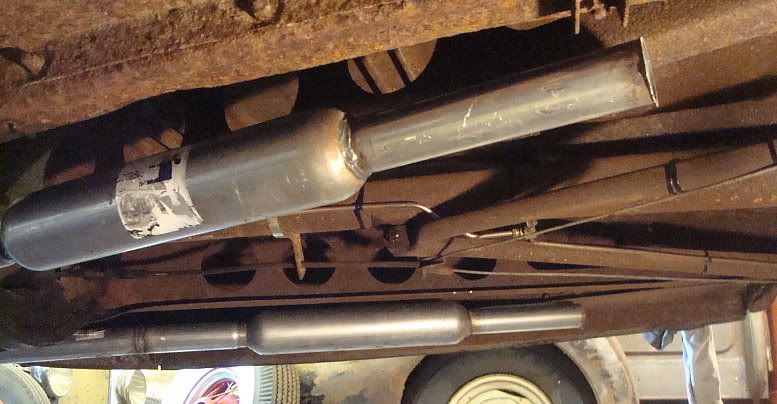
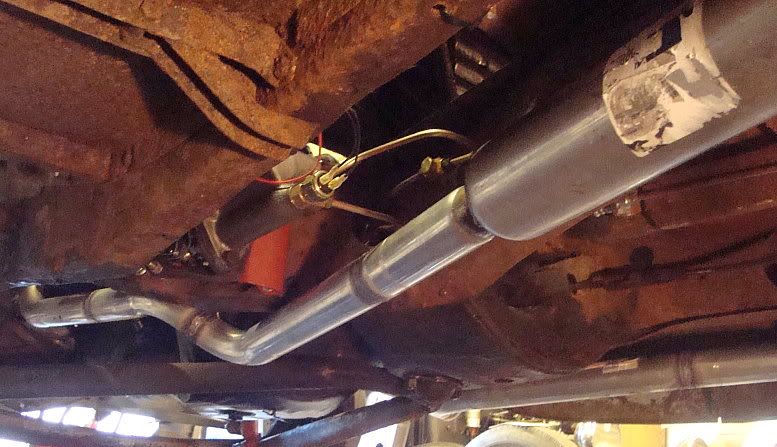
I still need to finish off the rear kickouts, and put a bobbin mount near the rear end but they are good enough for now, or at least to allow me to start the engine.
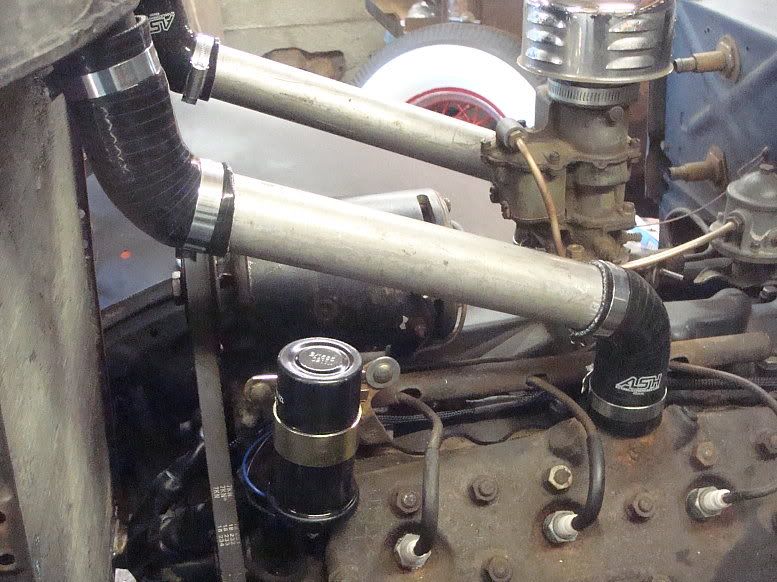
Next: Top Hoses. I rifled through my old hoses and found nothing suitable. I looked at tractor hoses on ebay but couldn't tell what would be the right size. I was looking for 45mm, or 1-3/4".
In the end I ordered two 180 degree bends in black silicone. I got the 180's because I could get two bends out of each one. I had two bits of 1-3/4" tubing, so trimmed them down to length and trimmed the hoses into 4 suitable pieces. They are a bit shiny and have a cheesy logo, but I'm going for functionality over beauty at the moment.
I finished wiring in the ignition module. Same as on Old Rusty, keeps the points but does away with the condenser. With all the problems associated with duff condensers lately, I thought it a good way to go.
I fitted the new coil I got from AES. Looked good, old fashioned terminals and all. Checked the timing was not 180 degrees out, (always worth the bother) but couldn't do any more as I hadn't got a battery cable.
Sourced a cable, but had to put one terminal on. Cleaned everything up, used the vice to crimp it as tight as I could, and then used the oxy acetalene with a very light flame to quickly heat it up and flow some solder into it. I managed to do it quick enough that I did not damage the insulation on the cable.
I got sidetracked a bit on another car, but on Sunday got back on the coupe. With the battery in place and the engine able to be cranked, it was time for the startup.
First preliminary check was the ignition - was it sparking? No.
I tried this and that, and only with another coil fitted could I get a reliable spark out of it. I ended up with a 100E Lucas LA12 coil date coded 1958.
I filled the rad with water and put a couple of gallons of fuel in the tank. I primed the pump and it lit up pretty well straight away.
Yay!
Then it stopped.
Obviously the ignition is the prime suspect, but no, a good healthy spark was available. Tried the primer on the pump and it pumped fuel. That's odd. If the pump were working, the primer would do nothing once primed.
I pulled the pump and housing, and the push rod was being held in by the baffle tube thingy. I grabbed the rod with some grips and made a discovery:
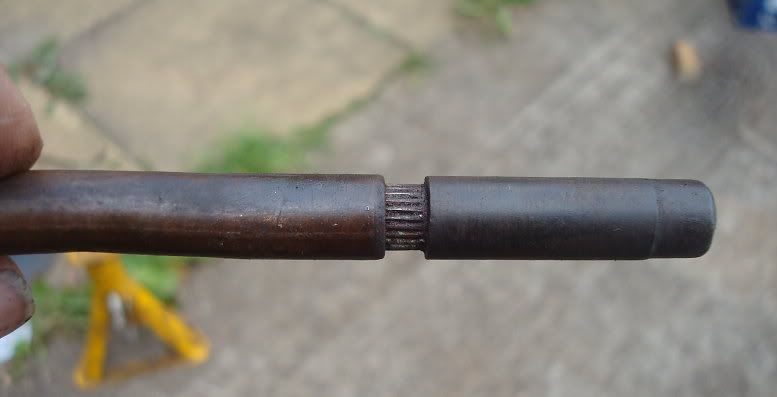
The ends are splined and pressed into the tubular centre part. That's handy. I drilled out some 6mm washers to 7.5mm and put two over the splined part and pressed it back together. I licked the od of the washers down on a grinder and here's how it looked:
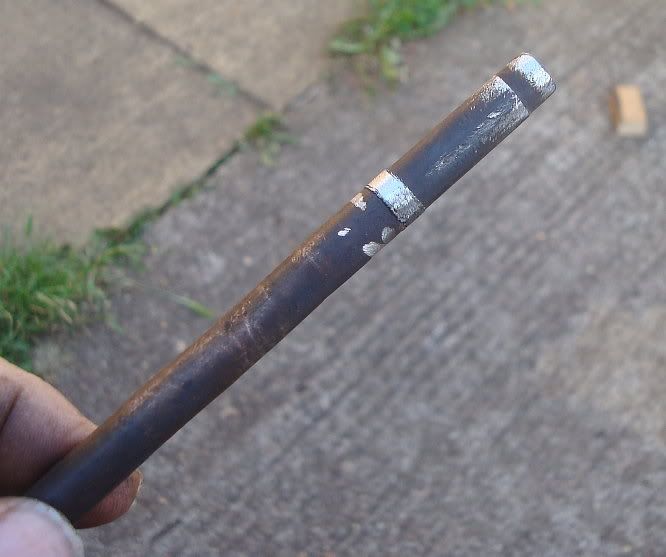
I put it in and tried it, but it was still no good, so I pulled it apart again and put two more washers in.
Success!
I ran it long enough to realise it was getting too hot due to having no fan.
So a pretty lack lustre update, but with a great result!
Here's the video of the startup, for any that have not seen it in the other post.
http://youtu.be/BEshHF63hck
Mart.
===================================================
OK folks: here's the biggie.. Mart
===================================================
7/14/12
Ok, lets get the build thread up to date.
I already posted the first drive thread, when I took the car for the MOT test. Getting the MOT is the first step in the process for getting the car registered. The details get entered onto the computerised system, all based on the chassis (vin) number. The tester verifies the vin number is correct to the vehicle and logs it all in. When the registration application is made, the details are already in the system.
Once the engine was running, there only remained a few things to do to get the car driving. First was to bleed the brakes. This is where I had a problem. I had bought new wheel cylinders from Macs. But they don't make them, and many other vendors get their cylinders from the same source. The fronts are all right, but the rears are machined wrong. Here are a couple of pics. First is an old lockheed cylinder, see how the feed and bleed holes enter the bore at the root of the larger bore.
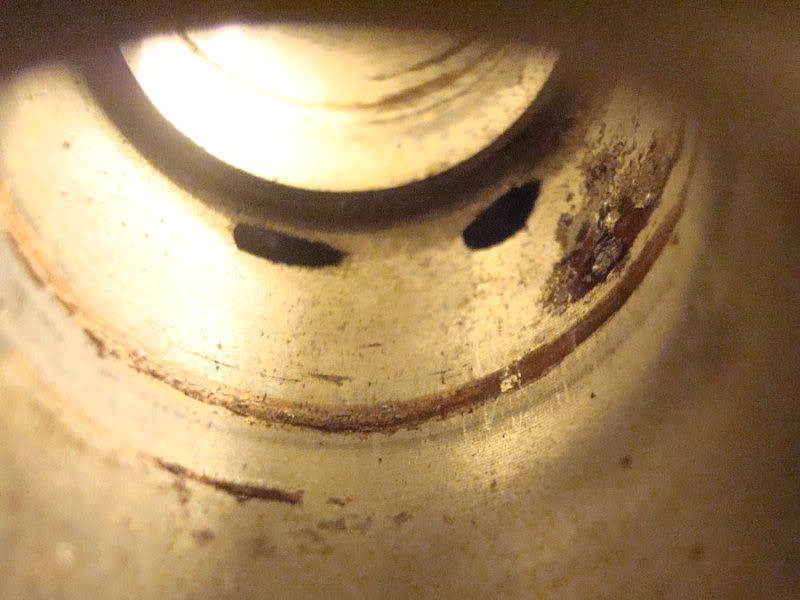
And here is a pic of the new part:
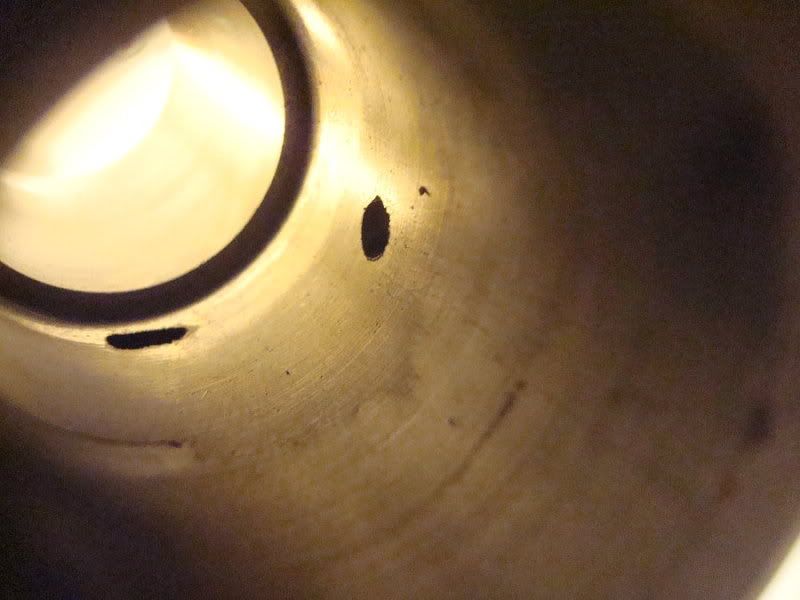
Note how the bleed hole is positioned correctly, but the feed hole is a lot further up the bore than it should be.
This caused a problem for me. I have decent shoes and good drums, so the pistons sit well down the bore. With the hole misdrilled, this put the seal lip over the hole and the fluid just leaked straight out.
I contacted Macs about it, and while it seems they will be prepared to refund my money, I don't think they will be troubling the supplier to see what's going on. hopefully they will, you never know.
I stripped, cleaned and rebuilt some older cylinders and fitted them. I then had trouble bleeding the system, but once I got out my old pressure bleed system, that soon came good. There was loads of air in the system, pump bleeding didn't get it out, but the pressure bottle did the trick.
So then it was a last round of checking things over, fitting splitpins and making sure the engine started and ran on demand. I had to rig up a horn, as it was a legal requirement, and refit little things like light lenses and the mirror.
The night before the planned test day I started it up and revved it a bit and it was misfiring and banging.
So at the last minute I stripped the distributor, cap and leads off Old Rusty, and put them on the coupe.
One of the last jobs was to refit the seat. When I bought it, the seat back had slipped out of position, which meant you couldn't really sit on the seat. I cleaned up the runners, wrestled the seat back in and got the seat back back properly into position. The base slipped into place easily and I was finally able to sit in it. The first time I drove it was probably only the second or third time I had sat in it.
And it felt good. I like the size of the 33. It fits me. Everything falls nicely to hand, and the visibility is better than on the 40. I also found it much easier to reverse than the 40. The access up the side of my house is quite tight and the 40 was a real struggle to get in and out. The 33 seems much easier.
I have already posted about the trip to the test station, but I'll post some pics here just to round off the build thread.
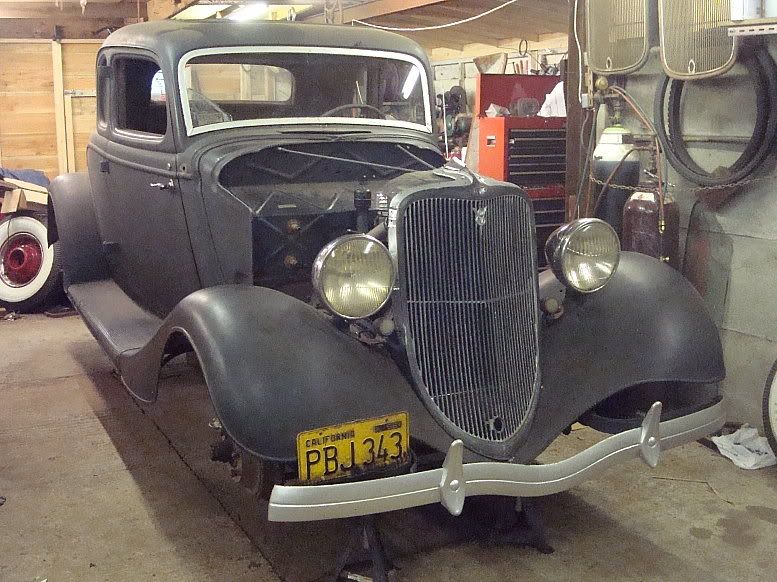
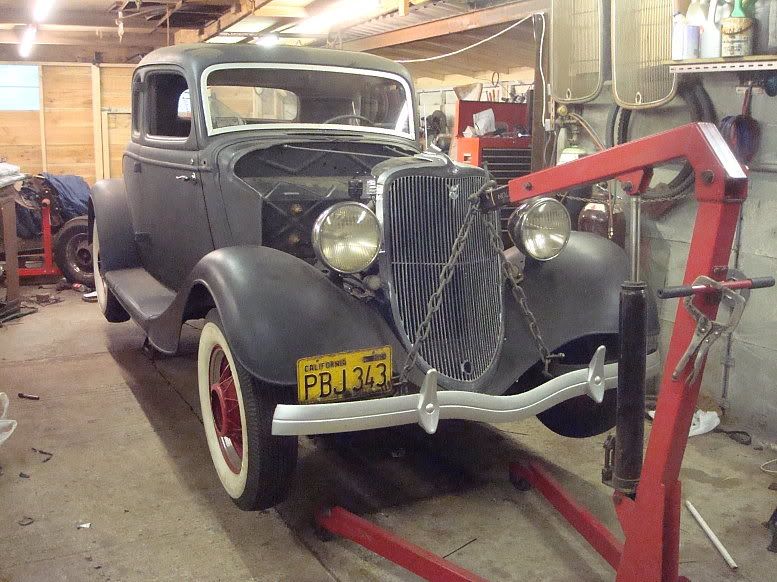
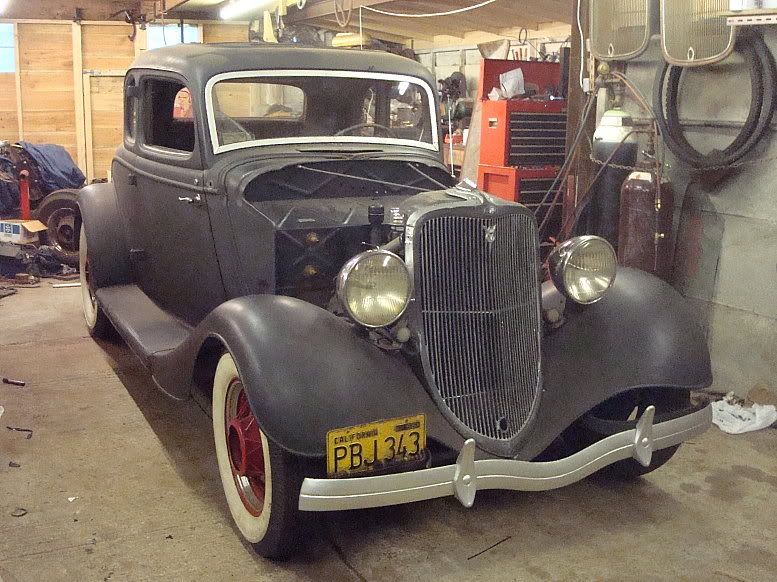
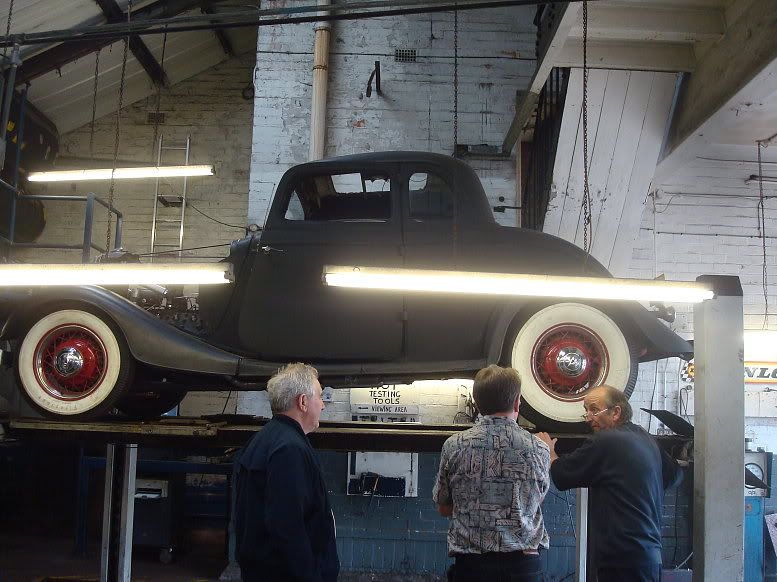
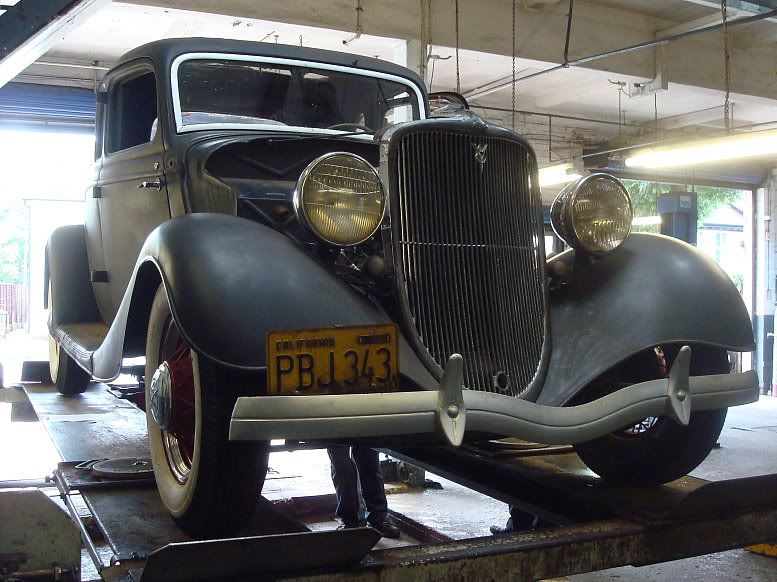
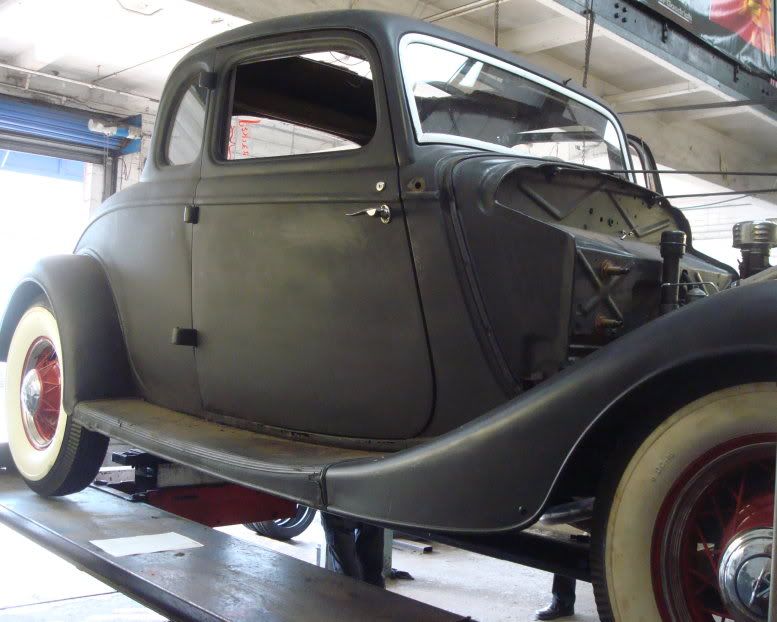
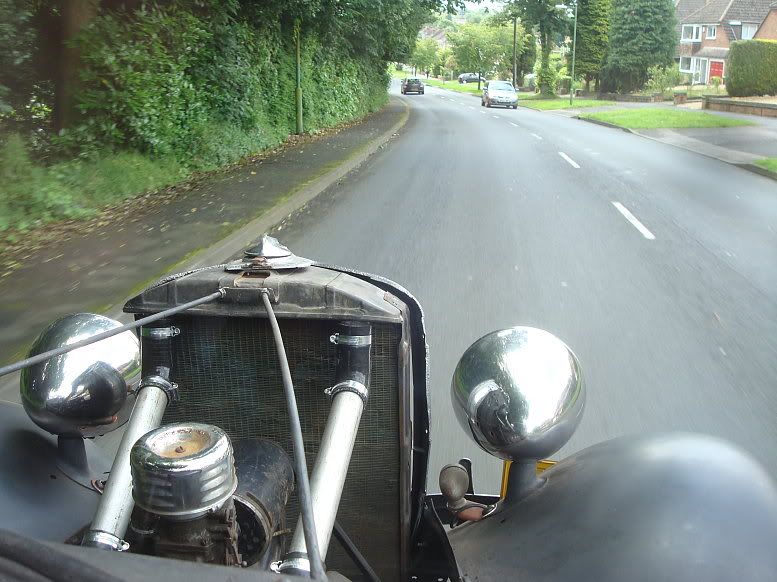
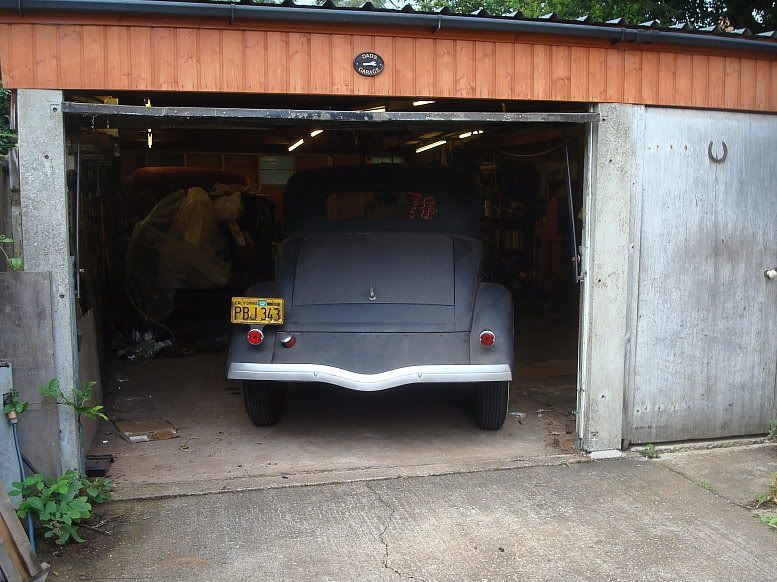
The journey there and back went really well. The car drove great. having a known engine "from carb to pan" was a great advantage. It takes a lot of the uncertainty out of it. So how did the rest of it go?
Clutch: Smooth and light. Also no chatter. The car has only one anti chatter bar, the one on the right, so I didn't know what to expect, but it was spot on.
Trans: I ran the trans exactly as removed from the car. I just whizzed a wire brush over the rusty gear teeth and buttoned it up with new oil and a new top gasket. It's a later bcase (41 pu I think) with early gears and shifter. Amazingly it ran smooth and quiet, just a little noise from the straight cut gears as can be expected. The synchro's are good if unhurried, again as can be expected from the earlier constant load synchro's, and amazingly it didn't jump out of gear in 2nd when going on/off the pedal. It does leak a bit, but I can put up with that at least for a while, overall I'm very pleased with the trans.
Axle: The bearing surfaces and wheel bearings were good, I didn't open the diff to have a look, I prefer blissful ignorance, but it drove nice. No unpleasant noises or clonks, Ok, it's got 4:11 gears, so soon leaves you trying to shift into another gear you don't have, but as far as I can tell it's all in good shape.
Brakes. Not fantastic. Light application results in a little pull to the right which had to be corrected by a little turn to the left on the steering. harder application seemed to be ok. I need to investigate further. Handbrake was very good. it all got tested properly on the machines at the test station and while the imbalance would be a problem for joe public in a daily the tester knows I will sort it out so wasn't concerned.
So that's it.Just less than three months from collection to first drive, and it's been a great journey for me, with a few blind alleys and mistakes, and curve balls thrown in, but triumphs too, and overall a great sense of achievement.
I started off rounding off my plan by saying I wanted to see what it would be like to drive an UNRESTORED 33 ford coupe, and now I know the answer: It feels GREAT!.
Mart.
Edit: For anyone that't's not seen the first drive video, here's a link: http://youtu.be/vExN5UrJ6mE
And the shocks: They work pretty well. I was worried about the low angle on the rears, but the car felt very stable on the roads even around the lanes, so I guess they must be working well.
M.
Time for a change.
I needed some exhausts.
I hoped to cull a few systems from the local scrappy, but that didn't work out so out of desperation I looked on ebay. I just wanted something I could bang on there to allow me to run it and get an MOT and have it on there for de-bugging.
I decided I didn't want to buy lots of bends and stuff, so I wanted a system. I clicked buy it now and bought a couple of these:
This is a mid section from a Nissan Primera. How un-hotroddy can you get.
There has been a balls up and I've got one, whatever happened to the 2nd one hasn't been settled yet.
But anyway, I got that one because it looked like it had some bends, some flanges, a silencer and some straight bits. I only had the image to go by, but it's for a 1600 engine, so shouldn't be too small.
Turns out it's 41mm dia, which is 1-5/8", which should be ok for a nice stock flatty.
Anyway, 10 minutes with the saw later:
Cleaned up one of the flanges, and redrilled it to fit the flatty manifold, and started welding bits together.
Hadn't really got enough tube, but did manage to come up with something that'll get 'er rolling.
It runs just below the frame, rather than through it, but hogs the middle, where the x-member dips low.
I just put little turnouts on because I was out of tube. I just need to but a little mount on the rear end.
This will do for now, just need to sort out the other side, a mirror image of this side once I resolve the issue with the seller.
I had also been looking at the top hoses and have ordered a pair of 180 degree silicon bends off the bay. I think I can use these with a bit of tubing in between.
That'll be it for a few days as I'm off to Belgium for a long weekend at the European hotrod and custom show in Chimay.
Can't wait.
Mart.
=============================================
07/02/2012
830
Mini update just to cross the I's and dot the T's.
Bloody exhausts! I ordered two exhausts from one seller on ebay. Long story short, one arrived, so I made up the left hand exhaust on the car. Bit of to-ing and froing with the seller and the second one arrived the Monday after Chimay. Problem was, it was completely different! Bollocks! But I liked the look of it better, the pipes were bigger, and the silencer a nicer (bullet) shape. I made up the right hand side, and as it was the second go around, it came out simpler and better. I was pleased with that one, so I just ordered another one from a different seller, making sure the manufacturer and part number matched. The re-do of the left side went quickly and easily and I'm pleased overall.
I still need to finish off the rear kickouts, and put a bobbin mount near the rear end but they are good enough for now, or at least to allow me to start the engine.
Next: Top Hoses. I rifled through my old hoses and found nothing suitable. I looked at tractor hoses on ebay but couldn't tell what would be the right size. I was looking for 45mm, or 1-3/4".
In the end I ordered two 180 degree bends in black silicone. I got the 180's because I could get two bends out of each one. I had two bits of 1-3/4" tubing, so trimmed them down to length and trimmed the hoses into 4 suitable pieces. They are a bit shiny and have a cheesy logo, but I'm going for functionality over beauty at the moment.
I finished wiring in the ignition module. Same as on Old Rusty, keeps the points but does away with the condenser. With all the problems associated with duff condensers lately, I thought it a good way to go.
I fitted the new coil I got from AES. Looked good, old fashioned terminals and all. Checked the timing was not 180 degrees out, (always worth the bother) but couldn't do any more as I hadn't got a battery cable.
Sourced a cable, but had to put one terminal on. Cleaned everything up, used the vice to crimp it as tight as I could, and then used the oxy acetalene with a very light flame to quickly heat it up and flow some solder into it. I managed to do it quick enough that I did not damage the insulation on the cable.
I got sidetracked a bit on another car, but on Sunday got back on the coupe. With the battery in place and the engine able to be cranked, it was time for the startup.
First preliminary check was the ignition - was it sparking? No.
I tried this and that, and only with another coil fitted could I get a reliable spark out of it. I ended up with a 100E Lucas LA12 coil date coded 1958.
I filled the rad with water and put a couple of gallons of fuel in the tank. I primed the pump and it lit up pretty well straight away.
Yay!
Then it stopped.
Obviously the ignition is the prime suspect, but no, a good healthy spark was available. Tried the primer on the pump and it pumped fuel. That's odd. If the pump were working, the primer would do nothing once primed.
I pulled the pump and housing, and the push rod was being held in by the baffle tube thingy. I grabbed the rod with some grips and made a discovery:
The ends are splined and pressed into the tubular centre part. That's handy. I drilled out some 6mm washers to 7.5mm and put two over the splined part and pressed it back together. I licked the od of the washers down on a grinder and here's how it looked:
I put it in and tried it, but it was still no good, so I pulled it apart again and put two more washers in.
Success!
I ran it long enough to realise it was getting too hot due to having no fan.
So a pretty lack lustre update, but with a great result!
Here's the video of the startup, for any that have not seen it in the other post.
http://youtu.be/BEshHF63hck
Mart.
===================================================
OK folks: here's the biggie.. Mart
===================================================
7/14/12
Ok, lets get the build thread up to date.
I already posted the first drive thread, when I took the car for the MOT test. Getting the MOT is the first step in the process for getting the car registered. The details get entered onto the computerised system, all based on the chassis (vin) number. The tester verifies the vin number is correct to the vehicle and logs it all in. When the registration application is made, the details are already in the system.
Once the engine was running, there only remained a few things to do to get the car driving. First was to bleed the brakes. This is where I had a problem. I had bought new wheel cylinders from Macs. But they don't make them, and many other vendors get their cylinders from the same source. The fronts are all right, but the rears are machined wrong. Here are a couple of pics. First is an old lockheed cylinder, see how the feed and bleed holes enter the bore at the root of the larger bore.
And here is a pic of the new part:
Note how the bleed hole is positioned correctly, but the feed hole is a lot further up the bore than it should be.
This caused a problem for me. I have decent shoes and good drums, so the pistons sit well down the bore. With the hole misdrilled, this put the seal lip over the hole and the fluid just leaked straight out.
I contacted Macs about it, and while it seems they will be prepared to refund my money, I don't think they will be troubling the supplier to see what's going on. hopefully they will, you never know.
I stripped, cleaned and rebuilt some older cylinders and fitted them. I then had trouble bleeding the system, but once I got out my old pressure bleed system, that soon came good. There was loads of air in the system, pump bleeding didn't get it out, but the pressure bottle did the trick.
So then it was a last round of checking things over, fitting splitpins and making sure the engine started and ran on demand. I had to rig up a horn, as it was a legal requirement, and refit little things like light lenses and the mirror.
The night before the planned test day I started it up and revved it a bit and it was misfiring and banging.
So at the last minute I stripped the distributor, cap and leads off Old Rusty, and put them on the coupe.
One of the last jobs was to refit the seat. When I bought it, the seat back had slipped out of position, which meant you couldn't really sit on the seat. I cleaned up the runners, wrestled the seat back in and got the seat back back properly into position. The base slipped into place easily and I was finally able to sit in it. The first time I drove it was probably only the second or third time I had sat in it.
And it felt good. I like the size of the 33. It fits me. Everything falls nicely to hand, and the visibility is better than on the 40. I also found it much easier to reverse than the 40. The access up the side of my house is quite tight and the 40 was a real struggle to get in and out. The 33 seems much easier.
I have already posted about the trip to the test station, but I'll post some pics here just to round off the build thread.
The journey there and back went really well. The car drove great. having a known engine "from carb to pan" was a great advantage. It takes a lot of the uncertainty out of it. So how did the rest of it go?
Clutch: Smooth and light. Also no chatter. The car has only one anti chatter bar, the one on the right, so I didn't know what to expect, but it was spot on.
Trans: I ran the trans exactly as removed from the car. I just whizzed a wire brush over the rusty gear teeth and buttoned it up with new oil and a new top gasket. It's a later bcase (41 pu I think) with early gears and shifter. Amazingly it ran smooth and quiet, just a little noise from the straight cut gears as can be expected. The synchro's are good if unhurried, again as can be expected from the earlier constant load synchro's, and amazingly it didn't jump out of gear in 2nd when going on/off the pedal. It does leak a bit, but I can put up with that at least for a while, overall I'm very pleased with the trans.
Axle: The bearing surfaces and wheel bearings were good, I didn't open the diff to have a look, I prefer blissful ignorance, but it drove nice. No unpleasant noises or clonks, Ok, it's got 4:11 gears, so soon leaves you trying to shift into another gear you don't have, but as far as I can tell it's all in good shape.
Brakes. Not fantastic. Light application results in a little pull to the right which had to be corrected by a little turn to the left on the steering. harder application seemed to be ok. I need to investigate further. Handbrake was very good. it all got tested properly on the machines at the test station and while the imbalance would be a problem for joe public in a daily the tester knows I will sort it out so wasn't concerned.
So that's it.Just less than three months from collection to first drive, and it's been a great journey for me, with a few blind alleys and mistakes, and curve balls thrown in, but triumphs too, and overall a great sense of achievement.
I started off rounding off my plan by saying I wanted to see what it would be like to drive an UNRESTORED 33 ford coupe, and now I know the answer: It feels GREAT!.
Mart.
Edit: For anyone that't's not seen the first drive video, here's a link: http://youtu.be/vExN5UrJ6mE
And the shocks: They work pretty well. I was worried about the low angle on the rears, but the car felt very stable on the roads even around the lanes, so I guess they must be working well.
M.


 . Simple to do & again Marts grille looks real straight and he may get lucky . No gibbs oil for mr dull as it goes on dirt roads some & that makes a mess . Did the drool spots clean up on ole blue ? THANKZ David J


