

You are using an out of date browser. It may not display this or other websites correctly.
You should upgrade or use an alternative browser.
You should upgrade or use an alternative browser.
I just need to adjust the idle?
- Thread starter Old Redneck
- Start date


50fordcoupeman
Well-known member
It looks to me that in the second photo the idle adj screw is about in the middle of the photo. It (I think) is the screw with the little spring under it. Should unscrew it for lower idle rpm's.
Old Redneck
Well-known member
Ok I back off that black screw off where it was not touching. Made no difference BUT when I push on the other side of the black screw the idle came down real nice. I back off that screw 5 times and the idle stay high. You help me Thank you. I need to get some books on this rascal to make life more easy.
50fordcoupeman
Well-known member
Sounds like there is a spring missing/broken that should pull the the linkage down to the slow idle position. The spring on my 302 is about a 1/2" in diameter and approx 6" long.
Old Redneck
Well-known member
I just drove it around the block.I spray some WD40 on it to see if that helps. It was stuck seams to work ok now.The speedometer does not work? Hope it a easy fix. The carburetor works very nice now. It has a Micky Mouse Radio that has to go. Nothing but original radio. Blue Dot tail lights. Sell them at Hershey. This Redneck don't need that junk. Generator don't work also. I got my work cut out on this Junker.
Attachments


dmsfrr
Well-known member
If the car was sitting with the battery disconnected long enough the generator may just need to be polarized. It's worth a try and won't hurt in any case...... Generator don't work also. I got my work cut out on this Junker.
to Polarize the Generator...
* When the wiring job is done, before you start the engine, remove the Field wire from the voltage regulator and very briefly touch it to the Battery terminal of the voltage regulator (you will get a small spark) then reconnect the Field wire to it’s position on the voltage regulator. *
That carb looks like the stock '56 Bird setup.
Old Redneck
Well-known member
I disconnect the field and touch the Batt. got spark. hook back up and started the car and batt still red light on. I will take the generator off and have it check out. I put 4 quarts of transmission fluid in it today. Thirsty. Now watch for leaks. I got the roof painted and will put it on Monday. Also had a little trip around the block. Tires are bumpy. Only 25 years old. Do you run radials on your T-Bird? If so what kind?
dmsfrr
Well-known member
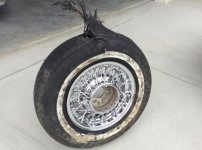
The brand name is Flintstone?... Tires are bumpy. Only 25 years old.

Might be time for new ones.
Radials are the way to go for a 'driver'. I've had Michelin's and Hankook. (but not the one in the photo)... Do you run radials on your T-Bird? If so what kind?
If you want the pricey Wide whitewall radials look at the various DiamondBacks..... https://dbtires.com/
.
Attachments
Last edited:

miker98038
Well-known member
I know pictures don't tell the whole story. I sense your a bit frustrated working on something different. But that's not a junker compared to what a lot of us started out with.
You've got way less work for a "driver" restoration than I did.
The radials in the more or less stock replacement size are a great improvement over bias plies. If you have to have the bias look, try the bias look radials. Sit down and have a beer before you look at the pricing. I've got them on my 32 hot rod, way better than the bias plies I built it with
You've got way less work for a "driver" restoration than I did.
The radials in the more or less stock replacement size are a great improvement over bias plies. If you have to have the bias look, try the bias look radials. Sit down and have a beer before you look at the pricing. I've got them on my 32 hot rod, way better than the bias plies I built it with
Old Redneck
Well-known member
Dad use to call my cars Junkers just to have fun with me. So that stuck and it don't make difference what shape my old car are in they are junkers. You fellows have been a great help and I want to say Thank You.I want to make this Thunderbird drive nice that my wife can drive it and enjoy it.

Hot Rod Reverend
Well-known member
Ok I back off that black screw off where it was not touching. Made no difference BUT when I push on the other side of the black screw the idle came down real nice. I back off that screw 5 times and the idle stay high. You help me Thank you. I need to get some books on this rascal to make life more easy.
Check out my website, www.hotrodreverend.com/blog when you have time. I cover these Holley 4000 carburetors in detail. The guru on this site though is SalCicala - he should check in soon.
One link to help you get started...
https://www.hotrodreverend.com/post...y-4000-carburetors-2x4-intake-manifold-part-1
Attachments


Old Redneck
Well-known member
It OK now the carb is working very nice now. Now on to the next problem's with the car. Not quit sure about the transmission taking 4 quarts to bring it up the normal mark. Is that normal to leak off while sitting for 12 years or more? I will half to watch it down the road.
Old Redneck
Well-known member
That what I though that a bad leak. Today it did not leak a drop which surprise me. We will see down the road. I took the T-Bird down to the paint shop to get the top put on?? It been there all day trying to get the top on correct and they are not getting anywhere. They started 10 AM and at 5 PM they are not done yet. The brackets don't line up and they are trying to adjust them so they can fasten it down. We will see what tomorrow will bring I guess.

paul2748
Well-known member
Hard Top? Is it the side brackets? If so, the top may have spread. . Be aware that the rear brackets changed style over the years so make sure the deck receptacle matches the top brackets. There may be another way, but using a strap hold down to pull in the sides and letting the top sit in the sun should bring it back. Adjust a little at a time.
In addition, if it's problem with the rear deck receptacles being too far back so the top doesn't line up with the front the receptacles are adjustable to a point.
In addition, if it's problem with the rear deck receptacles being too far back so the top doesn't line up with the front the receptacles are adjustable to a point.
That what I though that a bad leak. Today it did not leak a drop which surprise me. We will see down the road. I took the T-Bird down to the paint shop to get the top put on?? It been there all day trying to get the top on correct and they are not getting anywhere. They started 10 AM and at 5 PM they are not done yet. The brackets don't line up and they are trying to adjust them so they can fasten it down. We will see what tomorrow will bring I guess.
dmsfrr
Well-known member
Yes, there are three different shapes / styles of latches for the rear deck. (and 2 styles of latch handles)... Be aware that the rear brackets changed style over the years so make sure the deck receptacle matches the top brackets. ...
https://www.classictbird.com/Hard-Top/products/66/3/0
miker98038
Well-known member
The comments on the top are correct, and IIRC you've got both tops. Getting both tops to fit can be a chore, even if you're recovering the convertible top. I finally gave up trying to get my hard top to "narrow", and pulled the side pins that go into the latch mechanism right behind the doors (kept the latches). If you've got the original swing arm on the soft top (which I need because it weighs a ton) it's another PITA. One side at a time, then back to the first side, repeat as needed. Even at that, the new weatherstripping needed shimming. Not to keep all the water out, just so you couldn't see thru the opening.
You mentioned the transmission. Early FOM were air cooled, later had a cooler in the radiator. Might take a look and see what you've got. They also start in second gear, if you're not familiar with them, just ask.
My Dad and his buddy had a couple war surplus boats in the early 50's. They rebuilt one, and never got to the other. They named that one "Junker", so I get it.
You mentioned the transmission. Early FOM were air cooled, later had a cooler in the radiator. Might take a look and see what you've got. They also start in second gear, if you're not familiar with them, just ask.
My Dad and his buddy had a couple war surplus boats in the early 50's. They rebuilt one, and never got to the other. They named that one "Junker", so I get it.
Last edited:
Old Redneck
Well-known member
I am running into putting the hard top on the T-Bird now. Its a ***** lining up both sides. The passenger side line up but the driver side the rear tie down off 2 inches. The hooks could be longer. Might half to make them. The body shop that painted the top is installing it. They worked 4 hours yesterday and how Manny today?????. Found rust on the rear edge of the deck lid. Needs to be cut off and new made. That what you get when you buy a antique car I guess.