All suggestions welcome!
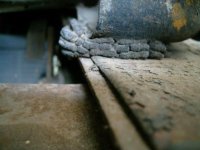
I have spent two days now attempting to put the coupe body back on the frame. Before removal of the body the door alignment was ok. I took the body off for two reasons. 1st was to check the serial number on the frame, (not a match to the motor) and 2nd to assist in the body work needed. I figured that with the body off frame the job of chassis rebuild and sheet metal/ paint could happen at the same time.
I have learned manny things about the coupe in this restoration. First is that not all repairs made durring its life were made correctly, or even by someone that new what they were doing, mis match parts, parts missing etc.
This brings me to the reason for the post. When the body was removed there were no bolts in the first hole at the cow on either side. Didn't take any out, didn't think to put any back! But when I opend the body bolt kit that I purchased along with the new wood blocks and rubber shims we had front body bolts.
Since there were no bolts in the hole prior to dissassemble I started at the rear of the cow. Figured i could add the front bolts after all others were in. Followed Less Andrews book to a tee. Was able to insert all wood blocks and shims with ease. Crawled out from under the car as was shocked at the alignment of the doors. That is where the majority of the two days have been spent. Adding and removing shimms to make the door fit accecpitable. Nothing's working
Ok when the body was off I checked the frame with a 4 foot level, All I had. The frame had a slight bow at the motor mount, less than 1/16 of an inch. figured that was less than a shimm, and I didn't have the tools to straighten it anyhow. so I let it go.
Now the passenger door is a little above the belt line and the rear of the door, however the drivers side is a 1/4 to 3/8's of an inch higher than the belt line at the rear of the door.
So evey thing I read leads me to believe that I should have started at the cow, since closed body cars shift like a parallelogram the front of the cow needs to come up, so the rear of the doors will come down.
NOW Is the cow supposed to be at a right angle to the frame, or should I use a level to plumb the rear of the cow,door opening or just shimm until the body lines are acceptable?????
If I am having this much trouble with the body I can't wait to put the hood on, and its not even painted yet !!!
Thanks
I have spent two days now attempting to put the coupe body back on the frame. Before removal of the body the door alignment was ok. I took the body off for two reasons. 1st was to check the serial number on the frame, (not a match to the motor) and 2nd to assist in the body work needed. I figured that with the body off frame the job of chassis rebuild and sheet metal/ paint could happen at the same time.
I have learned manny things about the coupe in this restoration. First is that not all repairs made durring its life were made correctly, or even by someone that new what they were doing, mis match parts, parts missing etc.
This brings me to the reason for the post. When the body was removed there were no bolts in the first hole at the cow on either side. Didn't take any out, didn't think to put any back! But when I opend the body bolt kit that I purchased along with the new wood blocks and rubber shims we had front body bolts.
Since there were no bolts in the hole prior to dissassemble I started at the rear of the cow. Figured i could add the front bolts after all others were in. Followed Less Andrews book to a tee. Was able to insert all wood blocks and shims with ease. Crawled out from under the car as was shocked at the alignment of the doors. That is where the majority of the two days have been spent. Adding and removing shimms to make the door fit accecpitable. Nothing's working
Ok when the body was off I checked the frame with a 4 foot level, All I had. The frame had a slight bow at the motor mount, less than 1/16 of an inch. figured that was less than a shimm, and I didn't have the tools to straighten it anyhow. so I let it go.
Now the passenger door is a little above the belt line and the rear of the door, however the drivers side is a 1/4 to 3/8's of an inch higher than the belt line at the rear of the door.
So evey thing I read leads me to believe that I should have started at the cow, since closed body cars shift like a parallelogram the front of the cow needs to come up, so the rear of the doors will come down.
NOW Is the cow supposed to be at a right angle to the frame, or should I use a level to plumb the rear of the cow,door opening or just shimm until the body lines are acceptable?????
If I am having this much trouble with the body I can't wait to put the hood on, and its not even painted yet !!!
Thanks