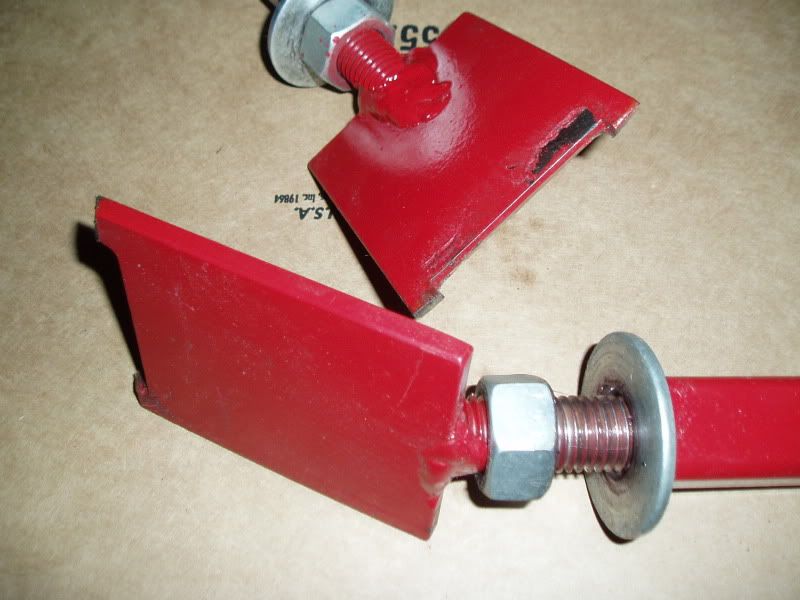
Rear spring spreader

Pa Joe

Senior Member
Just wondering if there is anyway I could get a drawing with measurements to make my own rear spring spreader. I'm reluctent to buy a pricey tool that would only be used once in a blue moon. I made one for the front, which was easy but the back one would be totally different.
 
back one is just as easy just one side at a time use one bolt head on banjo with one end make other end like front works great
 
I built the one in the link. Couple of notes.

You do not need the torrington bearing. Lots of lube will do the job.
The ends really should be strong I used a heavy steel and it did bend a little.
I also did not use the U channel. I used some very heavy box section I had laying around.

Do not fool around with the welds. They have to be good and everything has to be well braced It really has some force on it.
 
The spring spreader in the photo is the less expensive version of the ones most suppliers offer. This one does not have the spring loaded retainers and the thrust bearings. They were originally sold by AC&R for between $60 and $85. and it is just as safe.

I also have a home made one similar to the one in the posted web site. By the time I obtained all the material and had it welded it cost as much as a ready made one. Whatever the price, a quality made rear spring spreader is cheap insurance.

Whatever you do, please do not attempt to use a pipe and an all-thread against a banjo bolt, it is extremely dangerous and a good way to get yourself killed. If the pipe slips off the bolt head it will launch like a medieval cross bow.

Anyone who owns a Model A and does most of their own work should own a quality rear spring spreader. You will find you will use it more than once.

Tom Endy
 

Attachments

  • Spring spreader A5317.jpg
    Spring spreader A5317.jpg
    40.2 KB · Views: 388
I made mine just like the one Tom Endy posted above, except I used 1" square tubing that the 3/4" threaded rods could just fit into. As Kevin said, I use lots of grease and no bearing.
 
I also made one from scraps and I learned two things while testing it:
1. Don't make the frame ends too wide, as some rear springs will curl closed enough to keep the spreader captive once unshackled.
2. When tightening or loosening the rig it would be nice to have a handle off the top of the spreader to back you up. I am going to add a short pice of pipe that can be unthreaded from the spreader. when installed it will bump up against the spring or rear cross member(either side) and prevent the spreader from rotating while in use.
 
I made mine just like the one Tom Endy posted above, except I used 1" square tubing that the 3/4" threaded rods could just fit into. As Kevin said, I use lots of grease and no bearing.

When I took my spring off I made my own spreader and took the extremely paranoid approach of taking a large chain I had and wrapping it around the spreader, spring and housing so in case anything gave or slipped the chain would have a good chance of catching it.

I didn't know what to expect from this process and figured that I wasn't going to take any chances. turned out to be overkill but I didn't know what to expect.

I watched Dad get hurt by an old Split Rim truck tire ring in our garage at home when I was a kid and I remember the energy it had so I have a very healthy respect for springs and the like.

I wouldn't tackle it alone in case something goes wrong, but thats just me..
 
Re: Front and Rear spring spreader PAT. PENDING

Here is a spring spreader that I fabricated. There is no way the energy of the spring can be accidentally released. It will work on regular springs and reversed eye springs. I do not like the store bought spring spreaders because the spring energy is not completely capsulized and they can slip off the eyes. I usually remove the axle from the vehicle when changing shackles and springs because it is safer and it is not that much effort.
 

Attachments

  • 100_0241.jpg
    100_0241.jpg
    56.5 KB · Views: 584
  • 100_0240.jpg
    100_0240.jpg
    50.5 KB · Views: 526
  • 100_0239.jpg
    100_0239.jpg
    60.9 KB · Views: 551
  • 100_0238.jpg
    100_0238.jpg
    59.9 KB · Views: 542
  • 100_0237.jpg
    100_0237.jpg
    58.2 KB · Views: 629
Last edited:
sturgis39 .......................
I have never seen that design. I believe that is about the best that I have seen. Thanks !
MIKE :)
 
Sturgis 39,
What keeps the spreader from scratching up the bottom of the lower leaf? It seems like as the spreader is tightened (and loosened), it would make 1" or 2" scratches in the paint as the spring compresses or relaxes.
 
Mr. Sturgis:

I don't mean to belittle your design, but it appears the only way you can attach your spreader is by unbolting the u-bolt assemblies from the frame and pulling the rear end out with the spring still attached at the shackles. This puts a tremendous amount of strain on the center bolt that is holding all the leaves together. This single bolt was never ment to hold that much tension. If the head of the bolt should pop off, as it could be 80 years old and rusted, the leaves will fly 20 feet in the air and maybe do so just as you are leaning over it to attach the spreader.

The spreader in the photo is really the best bet. The feet securely grab around the shackle bosses and spreads the sping so that you can remove the shackle bolts and remove the rear end from the car leaving the spring safely in place under the car with the frame section holding it securely. You can leave the spreader in place for any length of time until you are ready to reinstall the rear end. With this method you do not have to unbolt the two u-bolt assemblies and fight the problem of getting the spring back in place with the center bolt head through the alignment hole in the frame section.

I have a cottage industry rebuilding Model A drive line elements and have rebuilt several hundred rear ends in the last 22 years. I have had several customers tell me horror stories about how they tangled with that deadly rear spring. I can't enphisize enough how caution should be exercised when dealing with a Model A rear spring.

Tom Endy
 

Attachments

  • Spring spreader A5317.jpg
    Spring spreader A5317.jpg
    40.2 KB · Views: 150
How many inches does the spreader have to move to take shackles off and release fully from spring?
 
Tom Endy

You have a good point about the center bolt. Working on springs is dangerous.

pooch

I think each nut was tightened about an inch or so. It did not seem like too much. It has been about six years since I have used it

wrndin.

You are correct but if you saw my car you would know another couple of paint flaws are not a big deal. I use POR-15 and can touch stuff up with a brush.
 
Last edited:
The spring doesn't really spread that much after you install the spreader. It depends on the weight of the car and how many leaves are in the spring. If the car has the axle housings sitting on jack stands and the weight of the car is on the spring, the spreader moves only slightly to capture the tension of the spring and remove the tension on the shackle bolts so they can be easily tapped out with a punch.

Once the rear end has been removed the spreader can remain in place on the spring until you are ready to reinstall the rear end. If part of the work is to also restore the spring, you then collapse the spreader and remove it before you unbolt the two u-bolt assemblies. There are quite a few inches involved when this is done I am not sure how much that is, but it is a lot. The collapsed spring then almost has the shape of a horse shoe rather than a bow (as in bow and arrow). It is amazing how far that spring can be spread from its point of rest. It gives you some idea of how much tension is being packed into it when fully spread to reach the rear end shackle bosses. The spring spreaders on the market, as shown in my photo have the capability of handleling the full travel distance.

Tom Endy

 
Maybe someone could post the distance of a spring out of car.

Then I could measure mine in car and add 2 inches.
 
Maybe someone could post the distance of a spring out of car.

Then I could measure mine in car and add 2 inches.

9af65616.jpg


My spare rear spring is buried in my plastic garage that caved in from the snowstorm the other day, but here are some measurments of the spring spreader I made. Remember, it looks just like the one Tom Endy pictured, except I used 1" square tubing.

The 1" square tubing is 30" long with a 12" brace welded across the middle. Each threaded rod is 12" long and cut at an angle for welding to the steel plates. The steel plates measure 3" wide and 3 3/4" long with about another 3/8" stub left at the corners to lock into the sides of the spring. Notice how I ground the ends of the plate and stubs at an angle to fit the spring.

The 30" square tubing was heated red hot in the center and bent to a 30* angle. The 12" brace is cut at a steep angle on each end to fit against the 30" bent tubing. If I pull a string tight to the bottom of the ends of the bent 30" square tubing and measure up to the bottom of the 12" brace I get 2 3/8". The string measures 28" from one end to the other end of the bent tube.

The 12" threaded rods are cut at an angle and the steel plates are welded to them at a 27* angle. Installed in the square tubing, with the nuts all the way collapsed the end to end measurement is 38".

It took some time to measure and figure the angles to make sure the spring spreader would fit the installed spring, then collapse enough to be removed when off the car. Hope this is enough information so you can make one. If you need more information or pictures, just ask.
 
Back
Top